Wireless On Campus - Information Technology Services
Navigation Menu
Wireless On Campus
Overview
The eduroam network is available in all university buildings, including residence halls, and most outdoor locations on campus. The network provides a secure connection and supports Print on the Go remote printing for students. It also is available 24-hours a day except during periods of scheduled maintenance or unforeseen network or electrical problems.
Eduroam allows you use your Temple login credentials (AccessNet email address and password) to connect to Wi-Fi while visiting any participating institutions, including local universities.
Residence Hall Students:
- Have a game console or media player? Connect instead to the turesnetextra network as described on this page.
- Wired ethernet service is not available in the residence halls.
- Wireless printers will be unable to connect to the wireless network on campus. If you would like to connect your printer, you will need to use a USB cable to connect it to your computer. As an alternative, Print on the Go allows you to wirelessly submit print requests and pick them up at any Print on the Go station.
Eligibility and Access
- Anyone with a current AccessNet username and password or guest login credentials, as described below under Guest Access.
- Sponsored guests, such as parents, friends, product vendors, conference attendees, and outside organizations, such as news media personnel.
- Temple visitors from participating Eduroam institutions who have a university/institution account username and password.
- WiFi (802.11 a/b/g/n/ac/ax) enabled device (laptop, tablet, or phone)
- Windows 10 or later
- macOS Big Sur or later
Connect a Computer, Phone or Tablet
To connect your device, see the instructions below to connect to the eduroam network. You can also watch the Wireless on Campus video to help you get connected.
The following steps explain how to connect for the first time. After the initial connection is established, you will connect automatically when you are in range of the network.
Note: Before performing the following steps to connect to the internet, verify that your laptop displays an active wireless connection. If the connection indicator does not appear, activate the connection by pressing the appropriate switch or key on your laptop. For detailed instructions, refer to the user guide for your computer.
You can also watch an overview video on connecting to eduroam on a Windows 10 or Later device.
1 of 5
Click the wireless icon on the system tray (lower right portion of the screen next to the date and time).

2 of 5
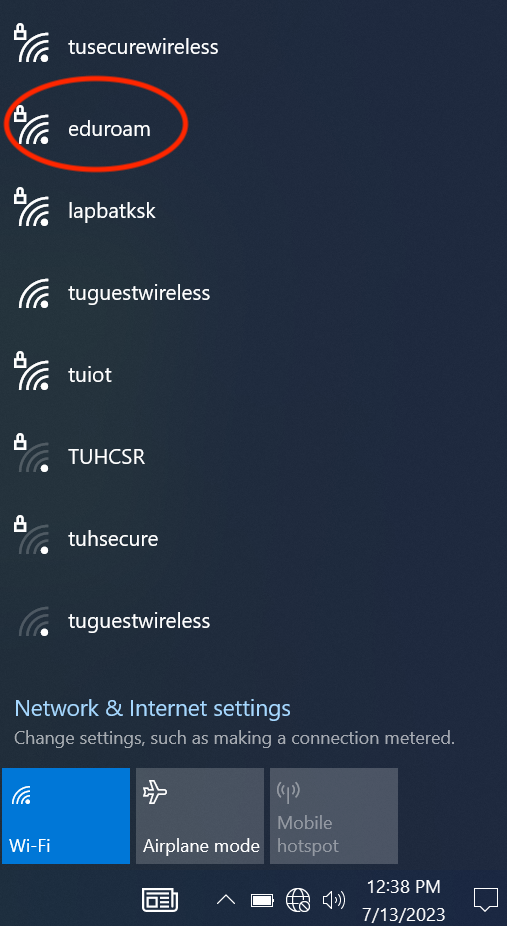
Click the eduroam network connection.

3 of 5
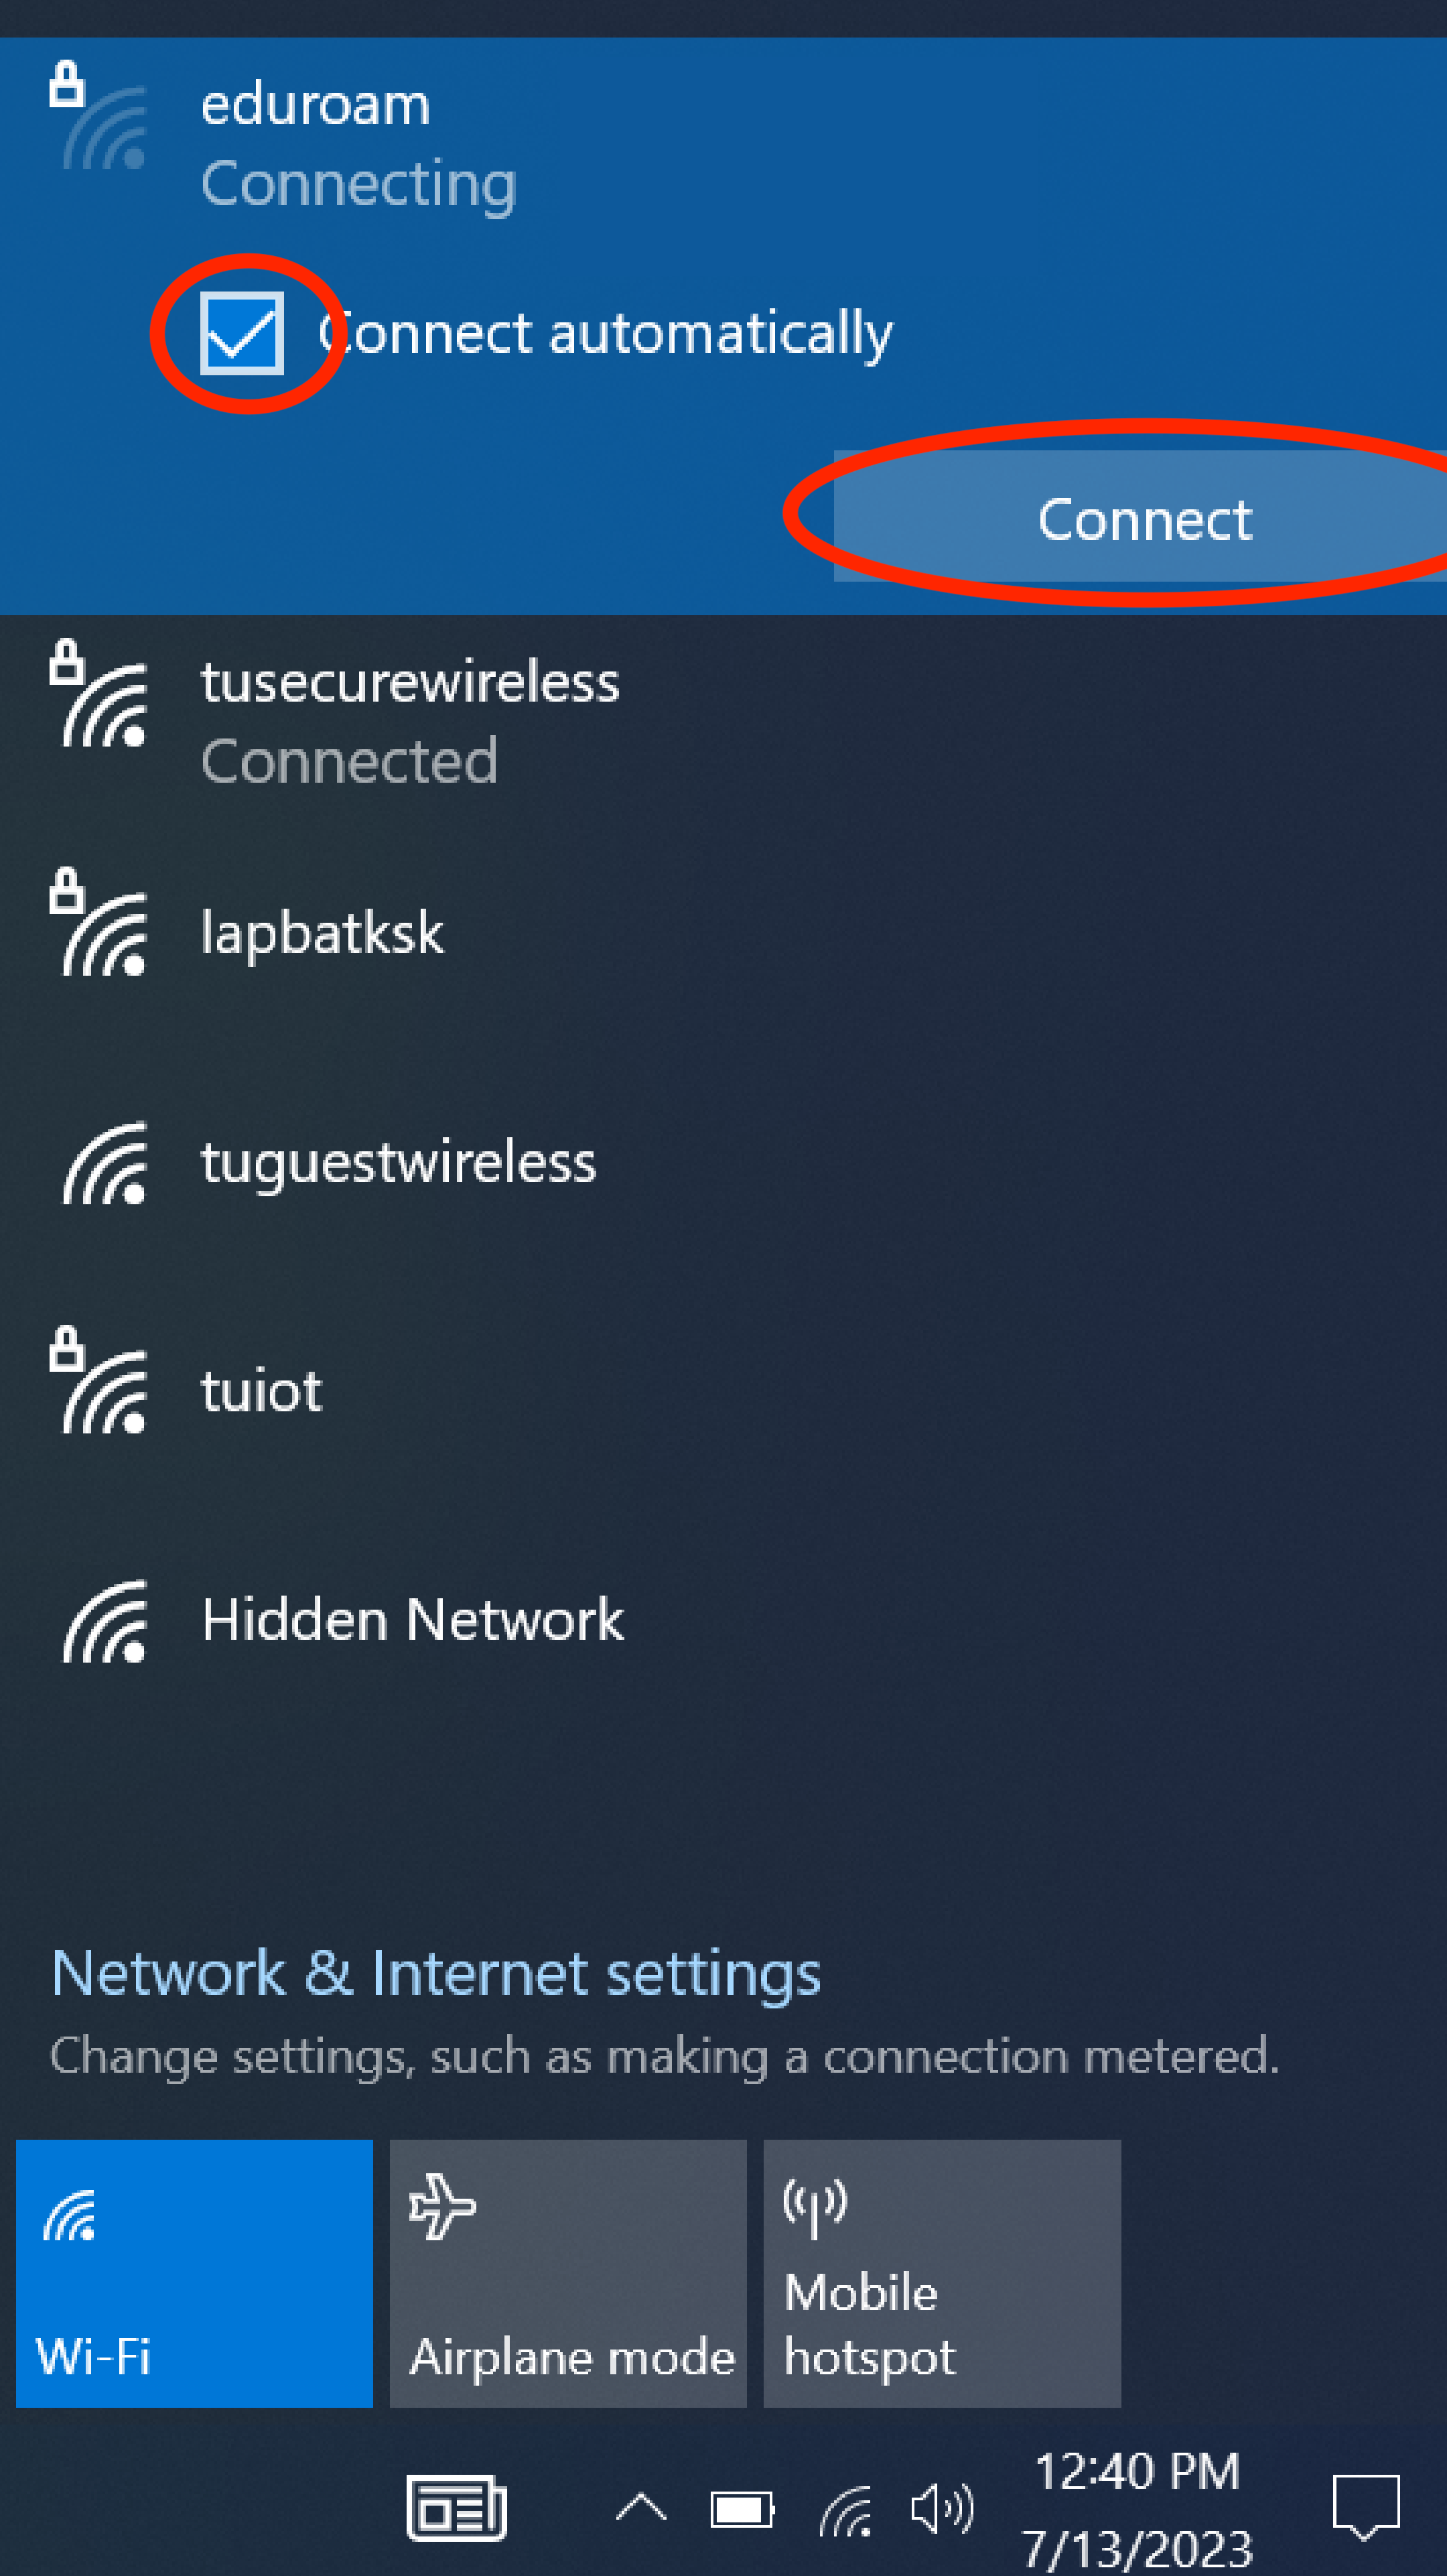
Click the check box next to Connect Automatically. Then click Connect.
4 of 5
Enter your AccessNet email address (e.g. tuzXXXXX@temple.edu) and password and then click OK.

5 of 5
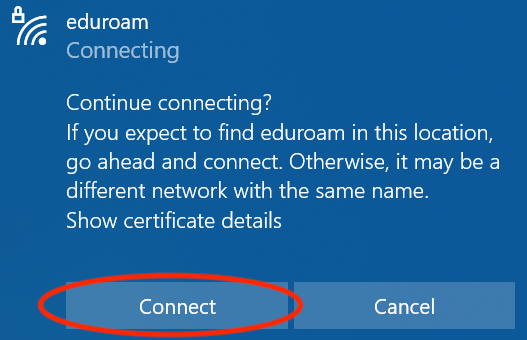
If you are prompted to continue connecting, click Connect.
1 of 3
Click the wireless icon on the system tray (lower right portion of the screen next to the date and time).

2 of 3
Click the eduroam connection.
3 of 3
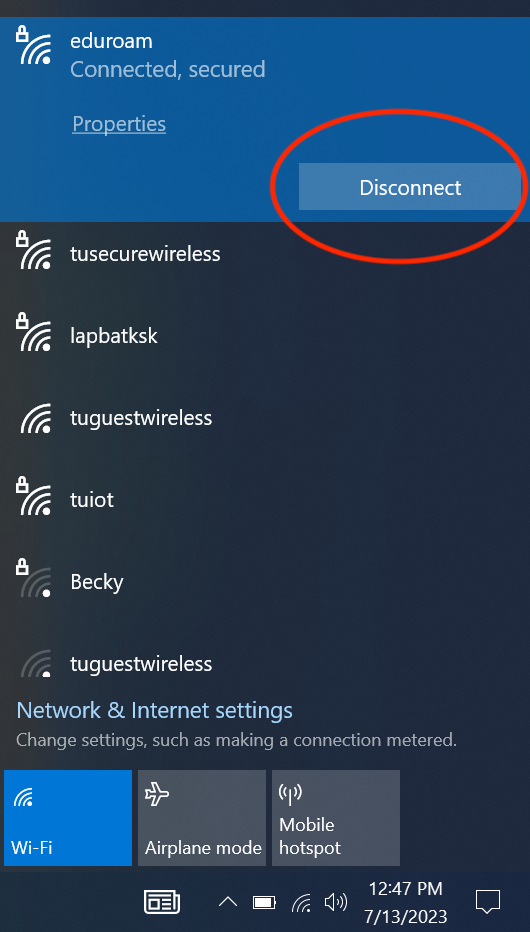
Click Disconnect.
The following steps explain how to connect for the first time. After the initial connection is established, you will connect automatically when you are in range of the network.
Alternatively, watch an overview video to help you connect your Mac to Wi-Fi.
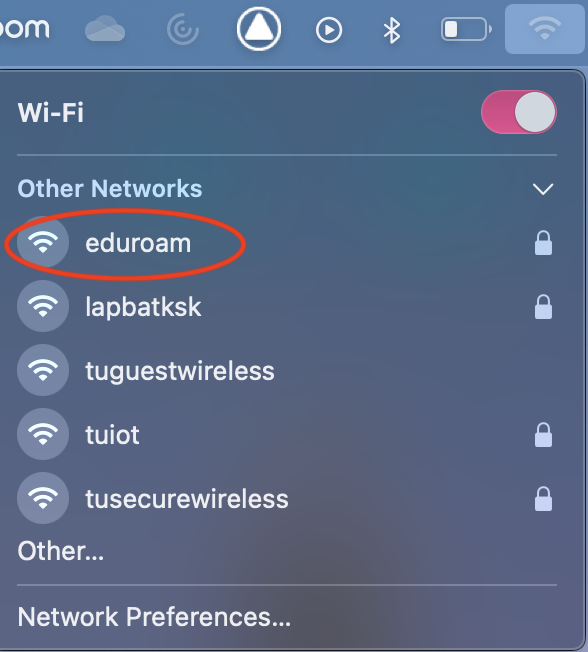
1 of 2
Click the Wi-Fi icon and select eduroam.
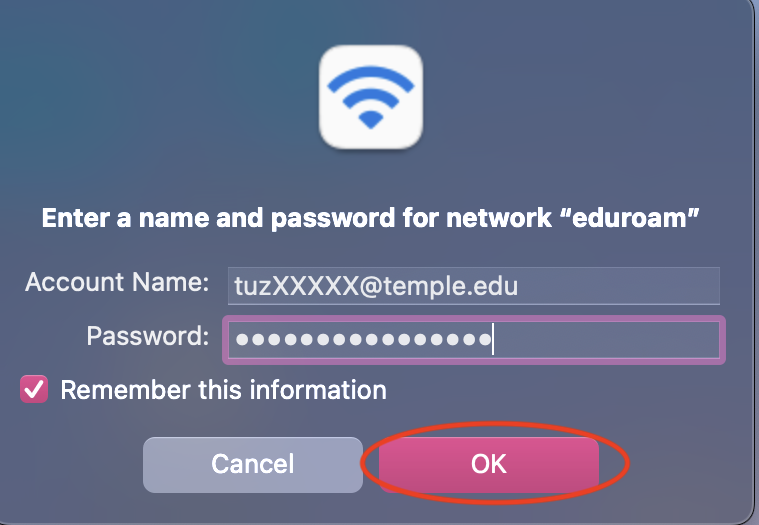
2 of 2
Perform the following:
a) Enter your AccessNet email address (e.g. tuzXXXXX@temple.edu) and password.
b) Make sure Remember this network is selected.
c) Click Join.
The following steps explain how to connect for the first time. You can also watch an overview video to connect your iPhone or iPad to the eduroam network.
1 of 6
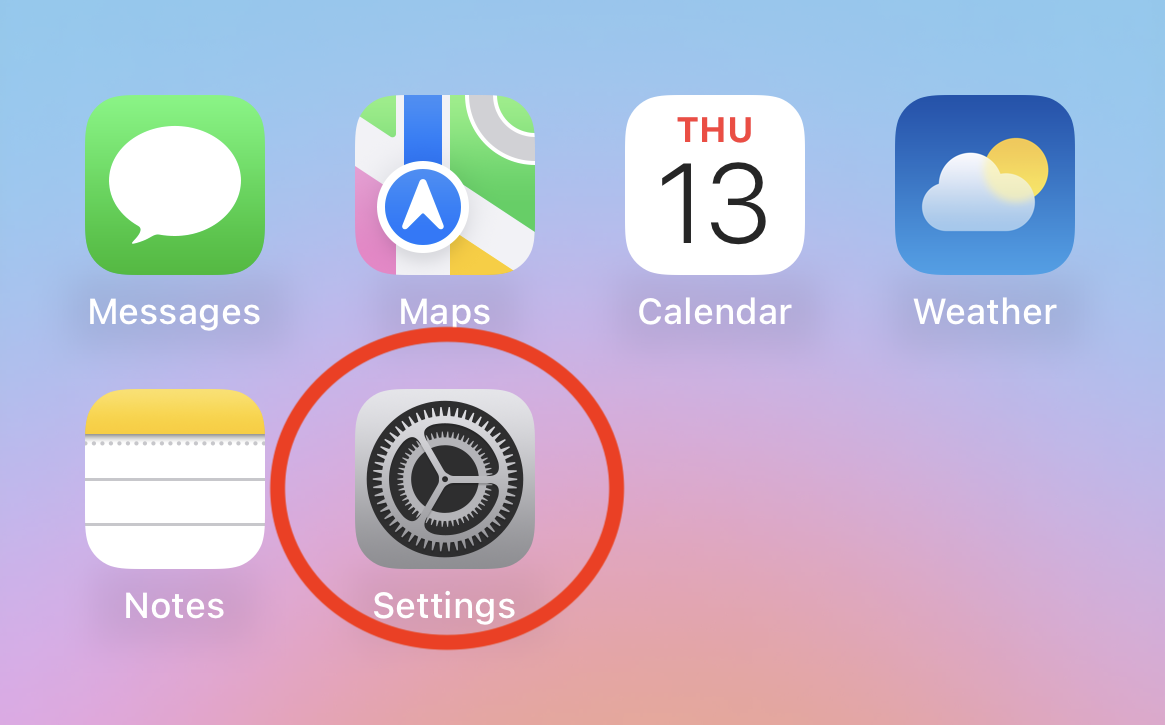
Tap the Settings icon.

2 of 6
Tap Wi-Fi.

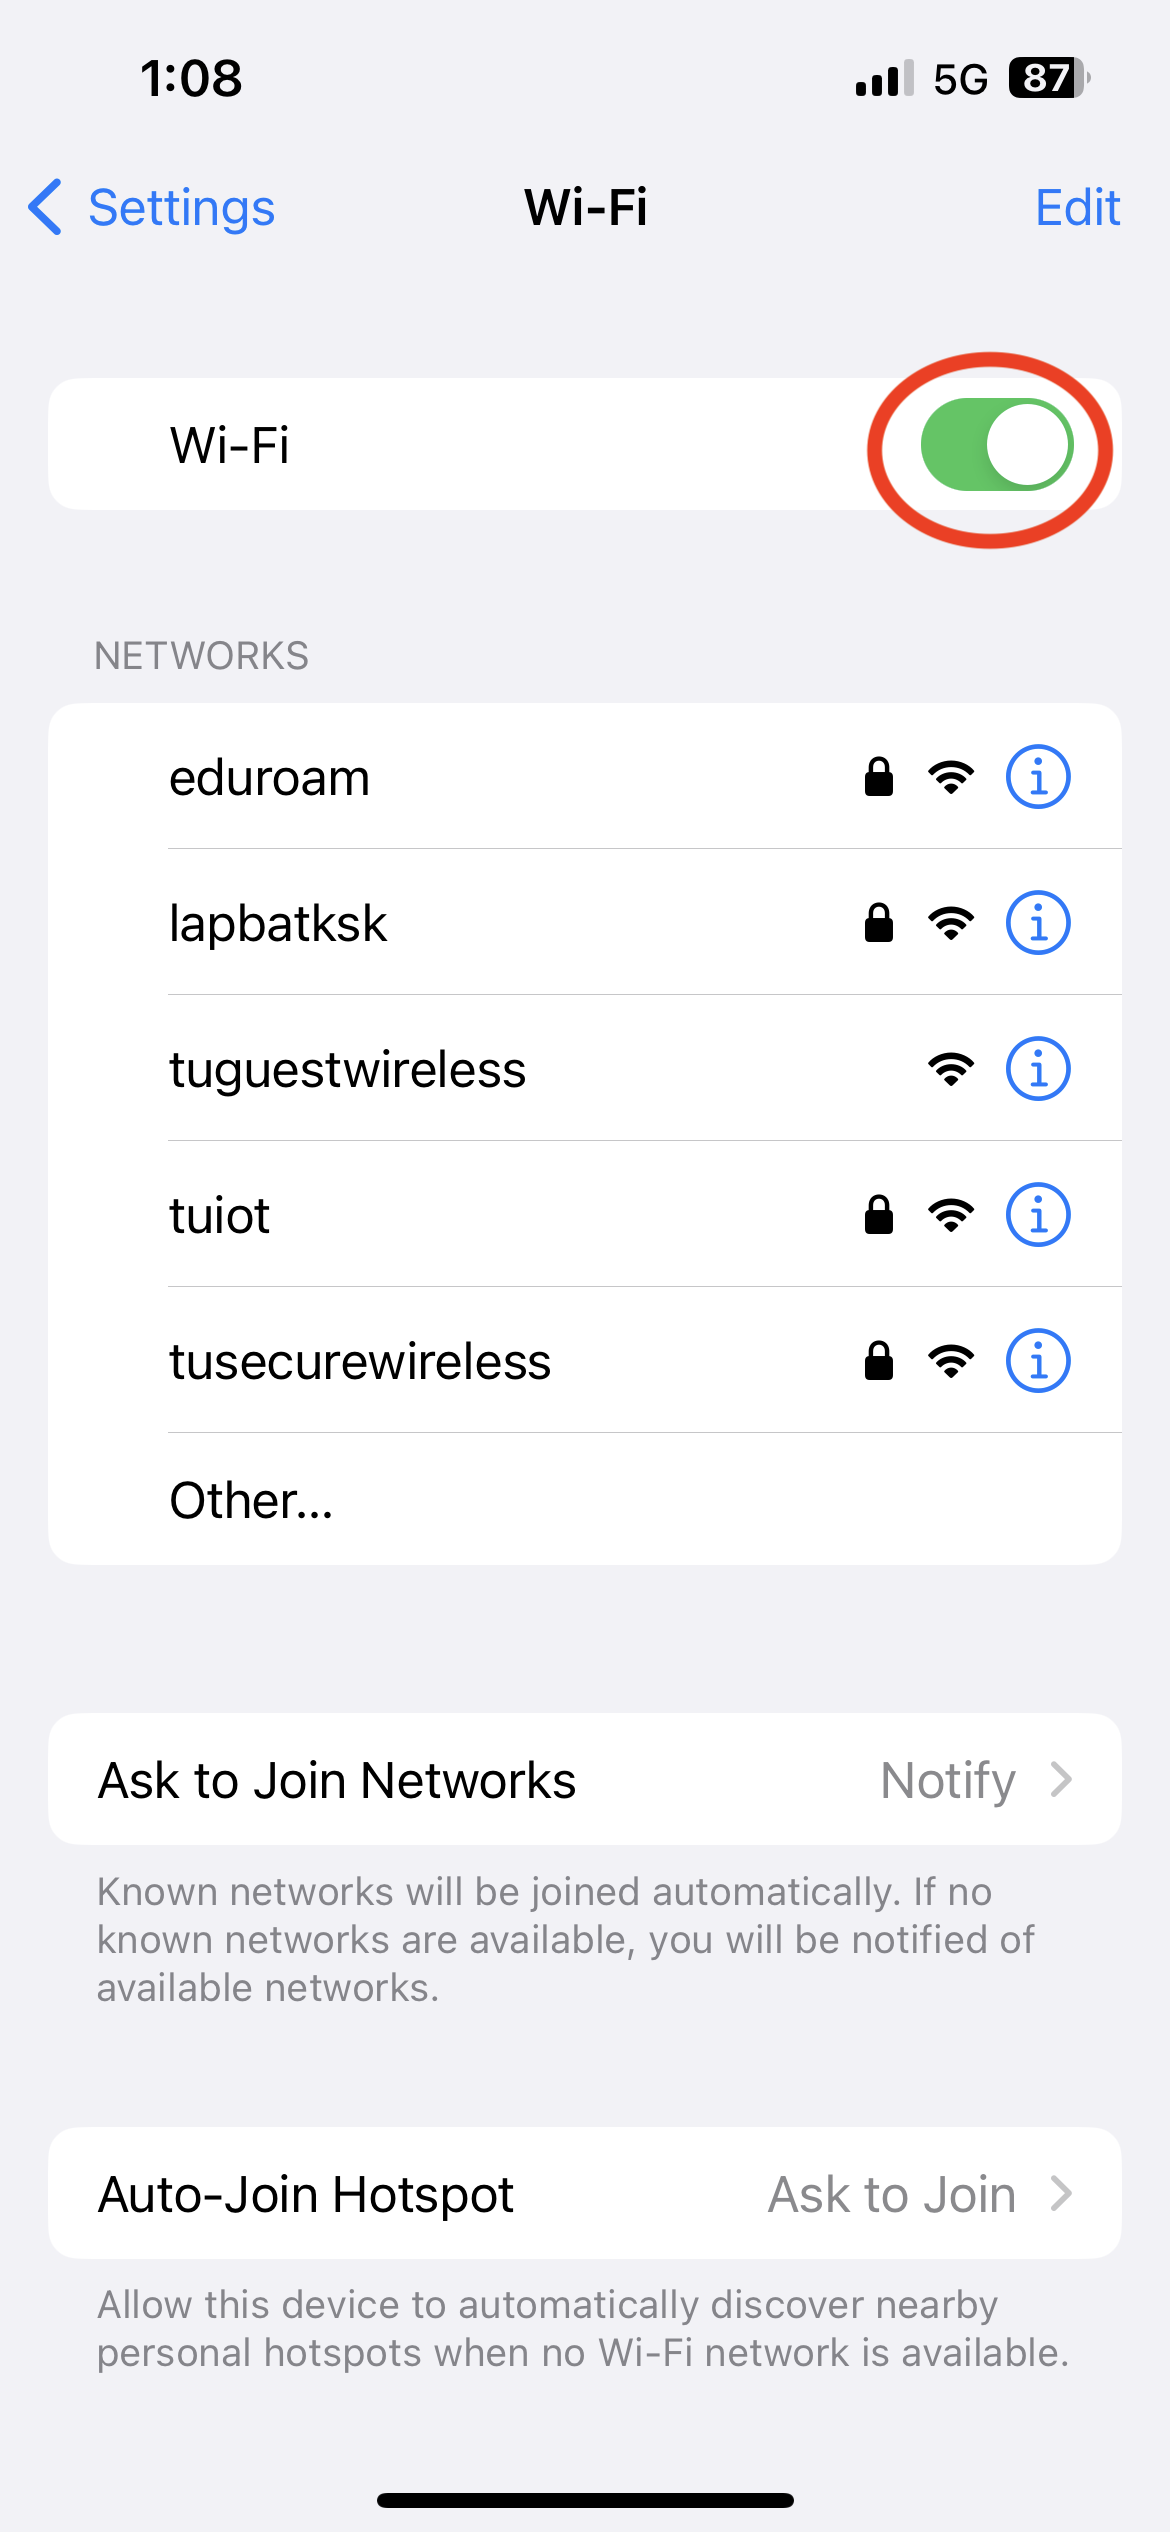
3 of 6
Make sure Wi-Fi is set to ON. Then under Choose a Network, tap eduroam.

4 of 6
Enter your AccessNet email address (e.g. tuzXXXXX@temple.edu) and password. Then tap Join.

5 of 6
Tap Trust.

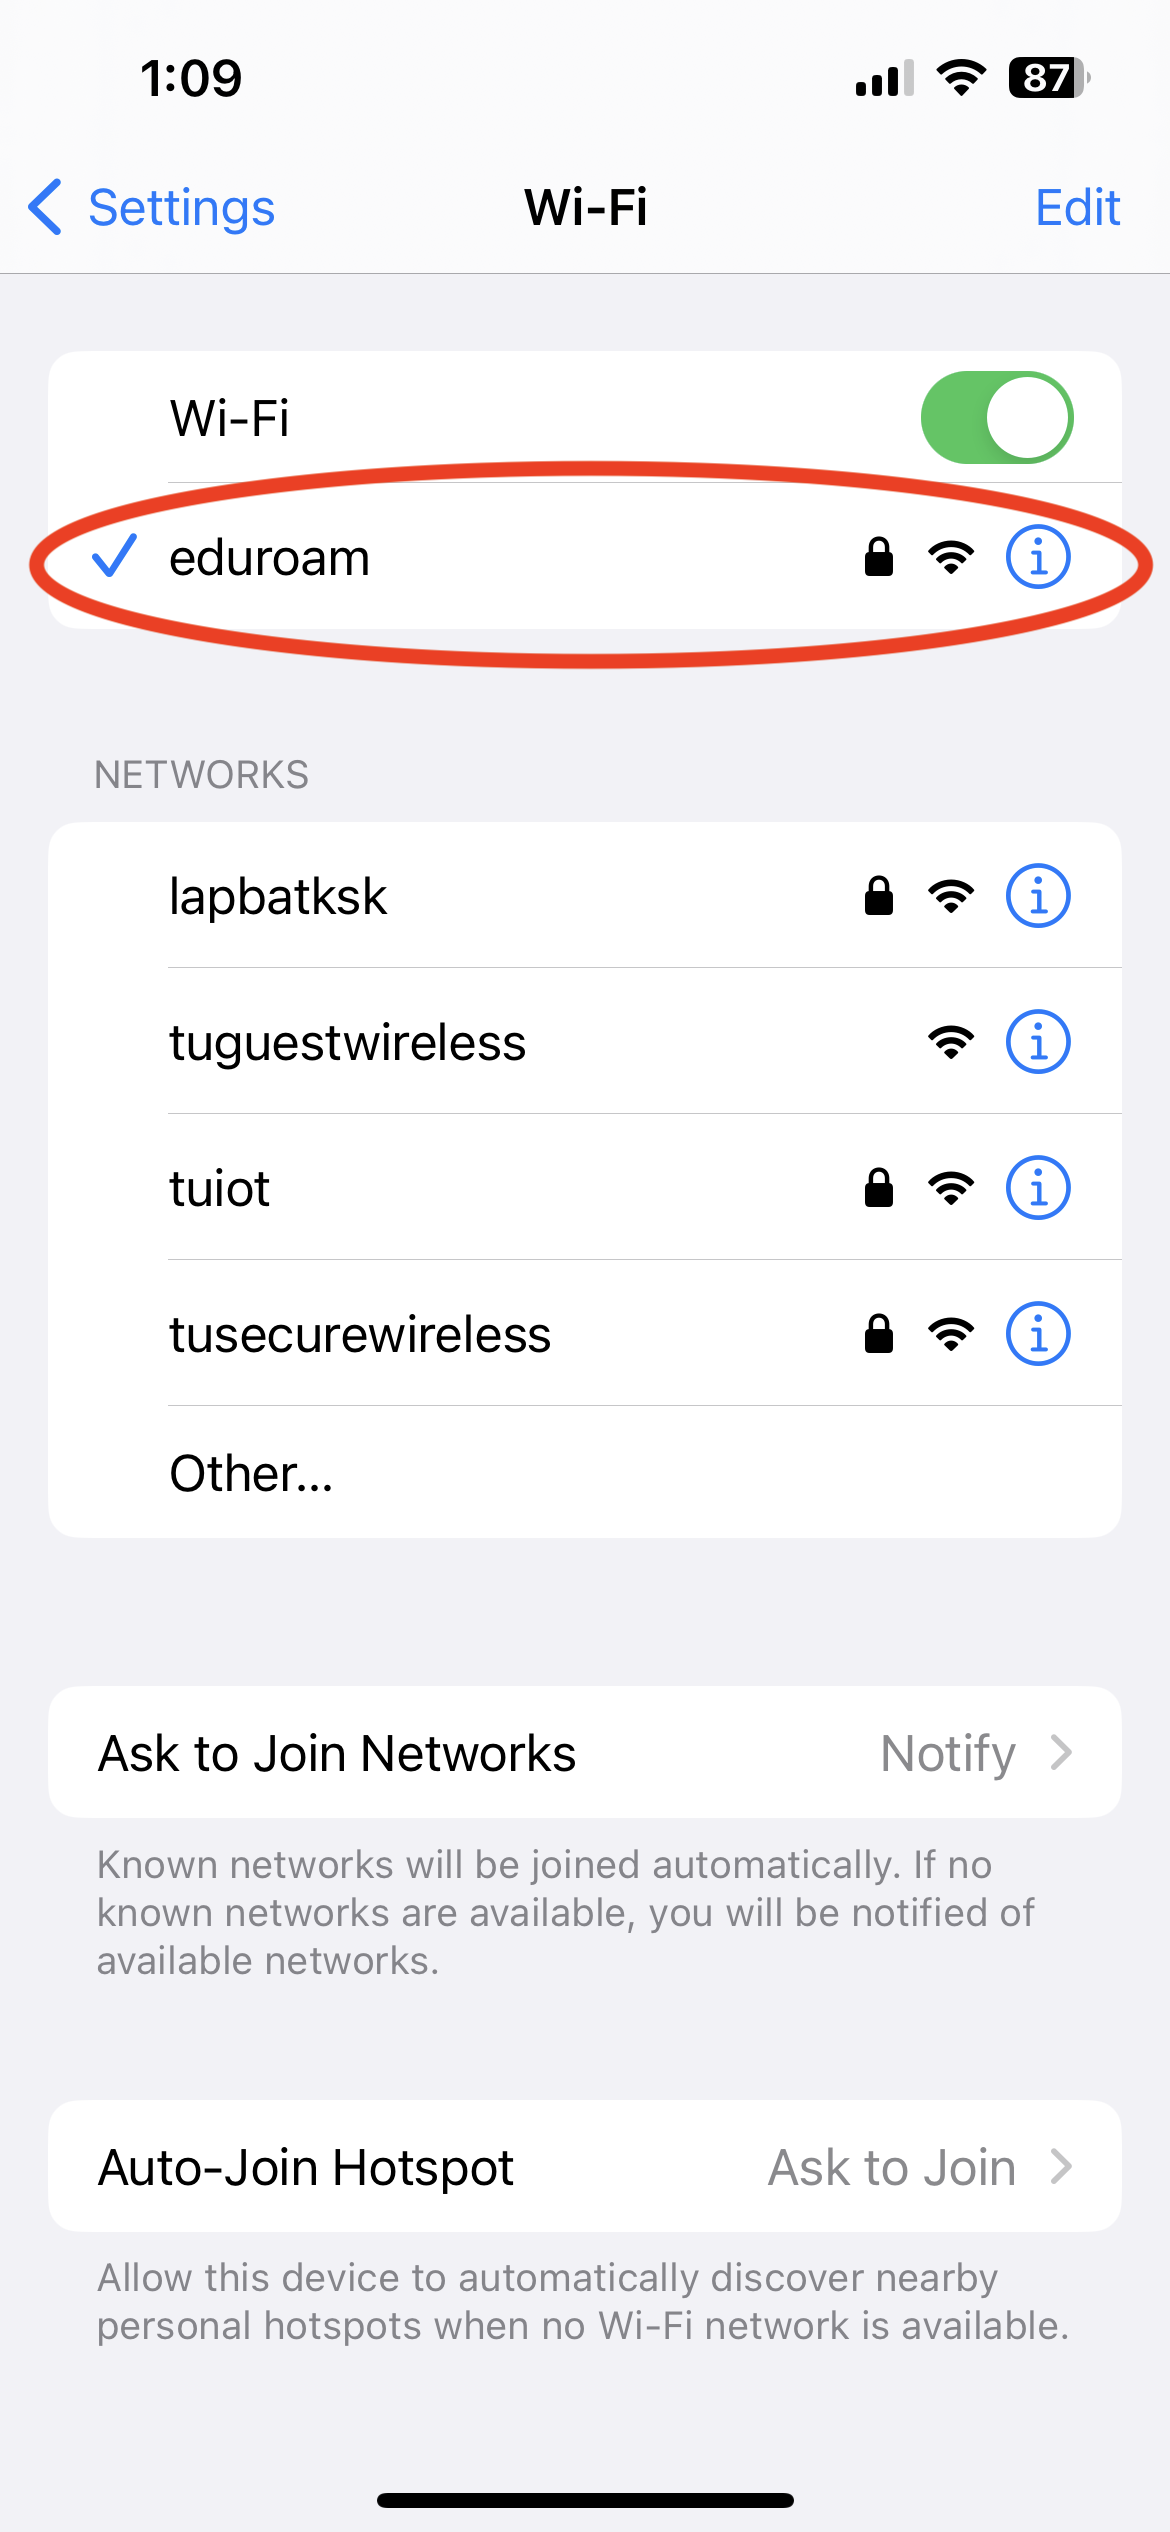
6 of 6
The Settings page reappears indicating you are now connected to the eduroam network.
1 of 3
Tap the Settings icon.
2 of 3
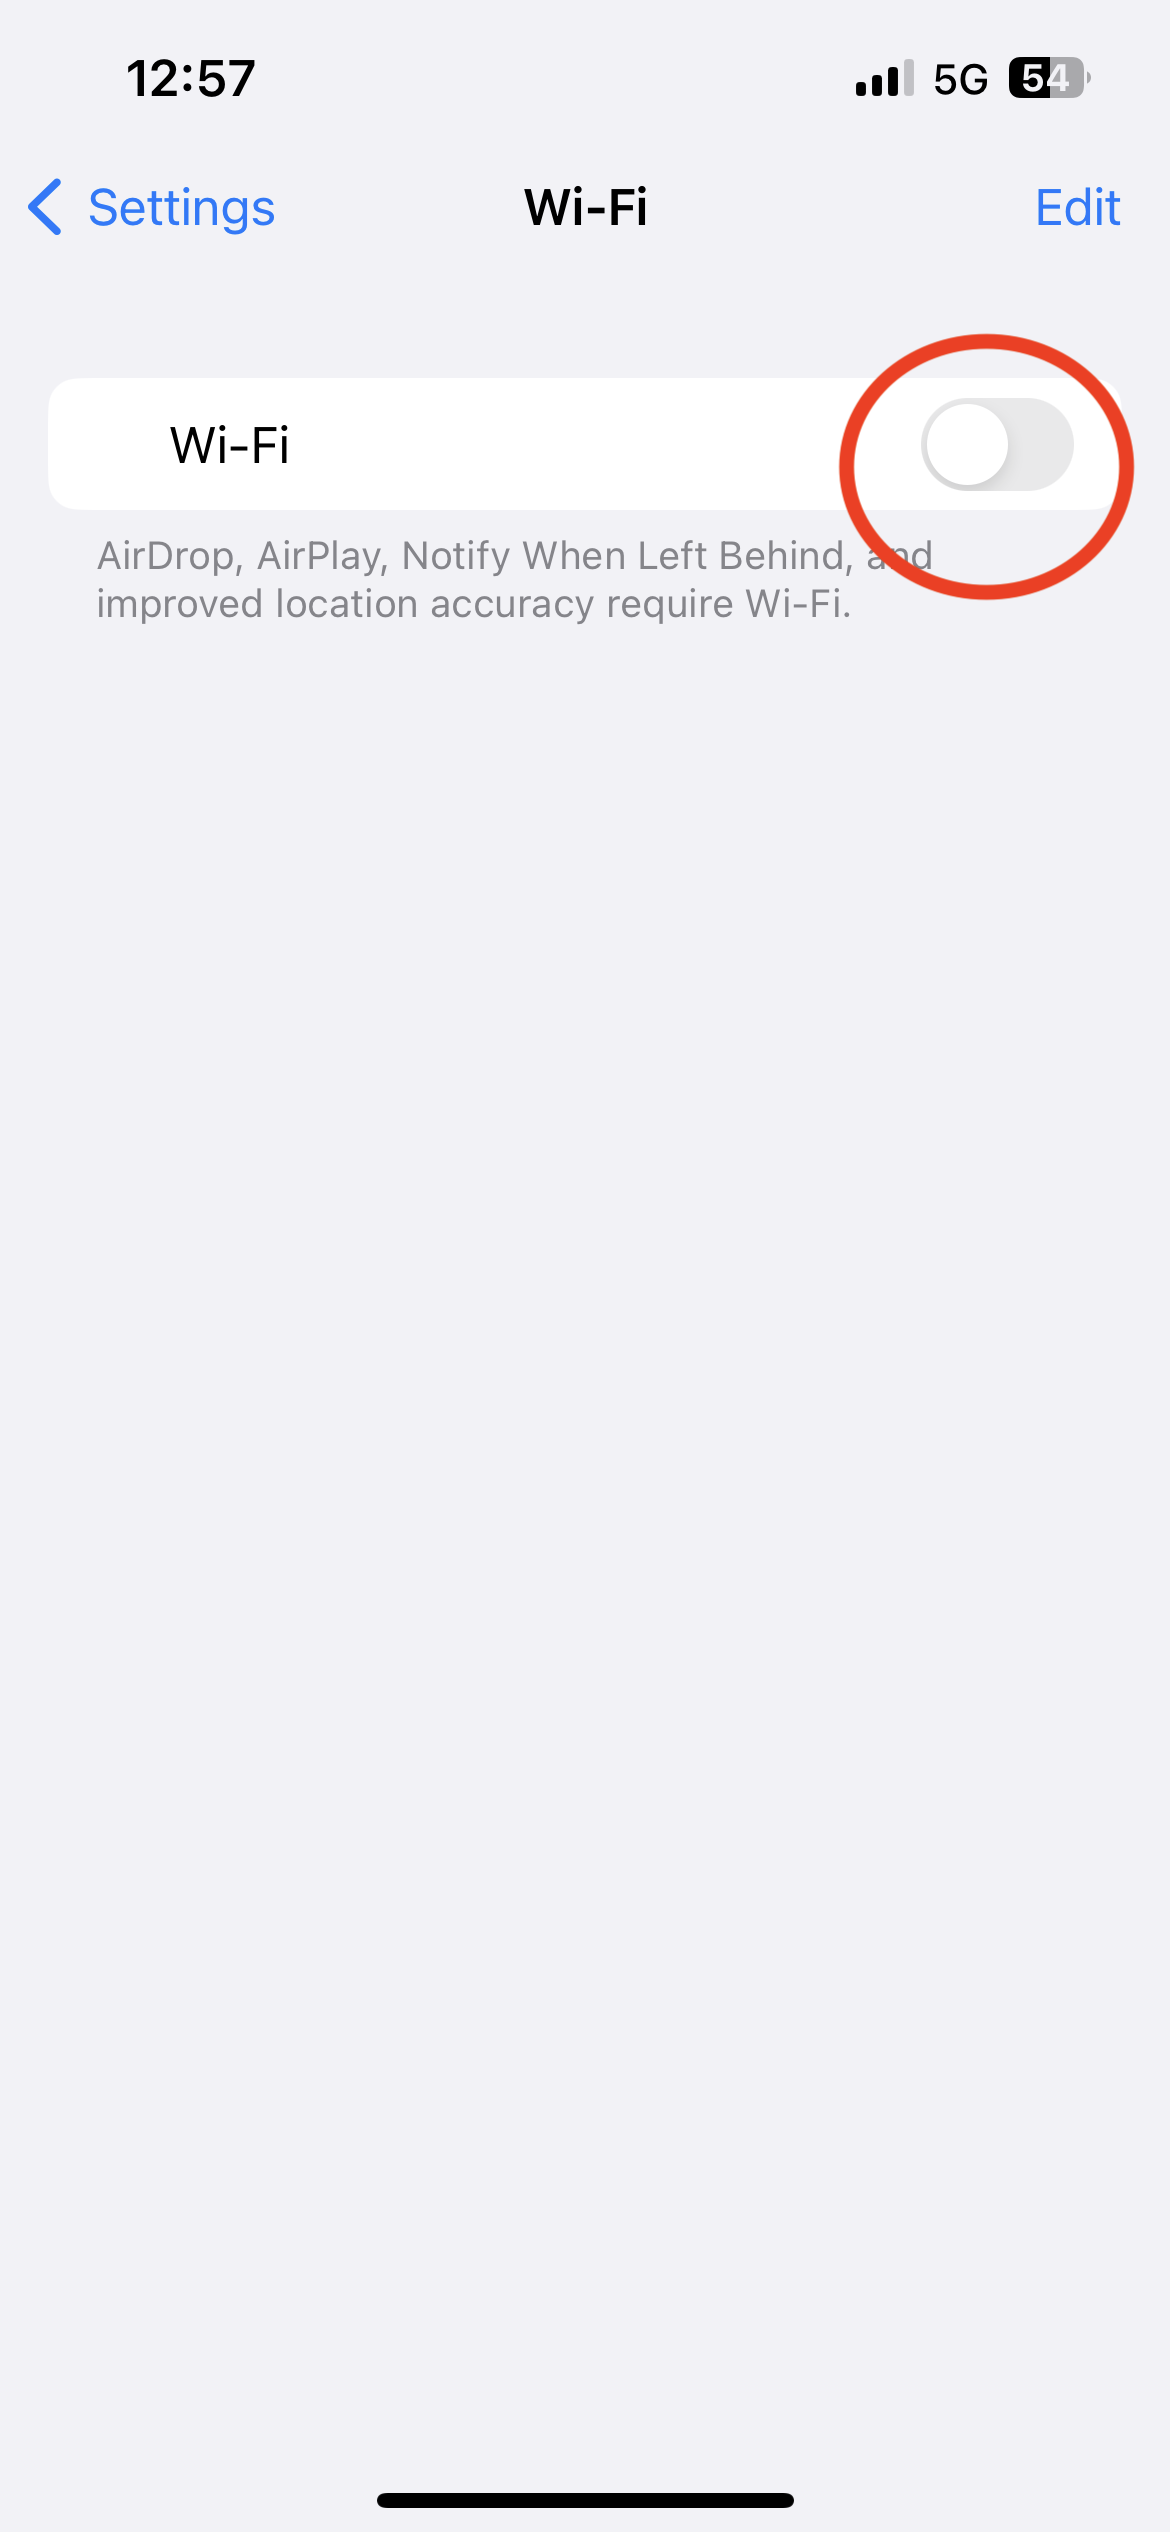
Tap Wi-Fi. Then tap the Wi-Fi indicator to switch from on to off.
3 of 3
You will now see that the Wi-Fi connection is set to off.
1 of 3
Tap the Settings icon.
2 of 3
Tap Wi-Fi. Then tap the Wi-Fi indicator to switch Wi-Fi from off to on.
3 of 3
You will now see that the Wi-Fi connection is set to ON. Under Choose a Network, tap eduroam.
1 of 5
Follow the instructions to connect your Android 11 or later phone to Wi-Fi. You can also watch an overview video to help you get connected.
Because of the many versions of the Android operating system, the exact steps may vary slightly depending on your device. If you are unable to connect using the steps below, refer to the Troubleshooting section below.
2 of 5
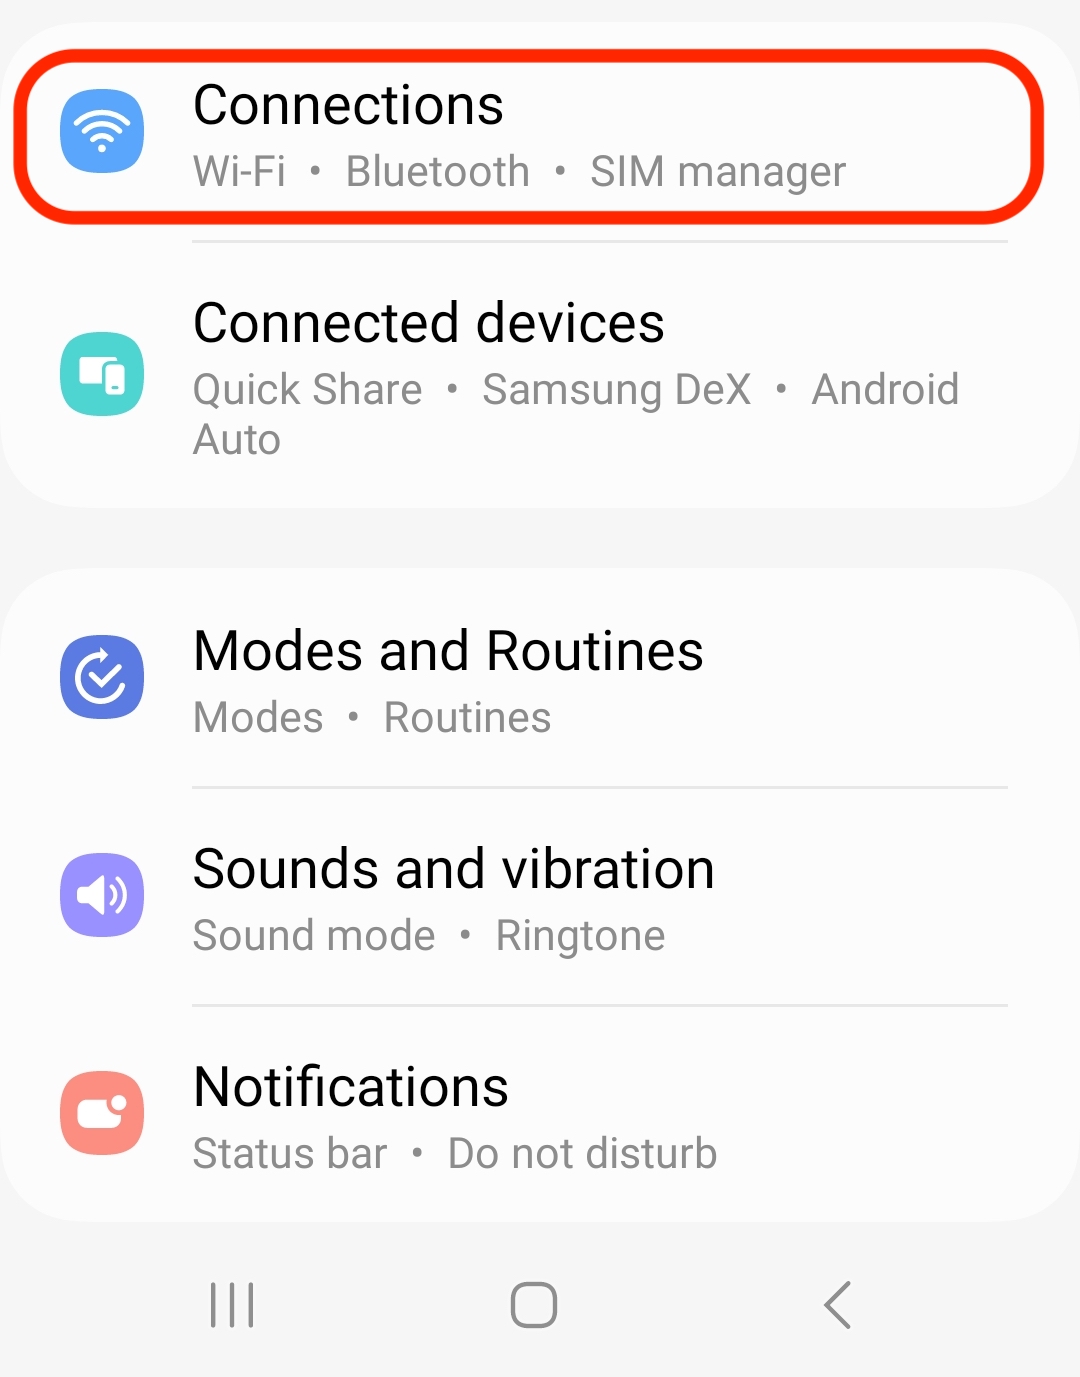
Go to Settings ![]()
3 of 5
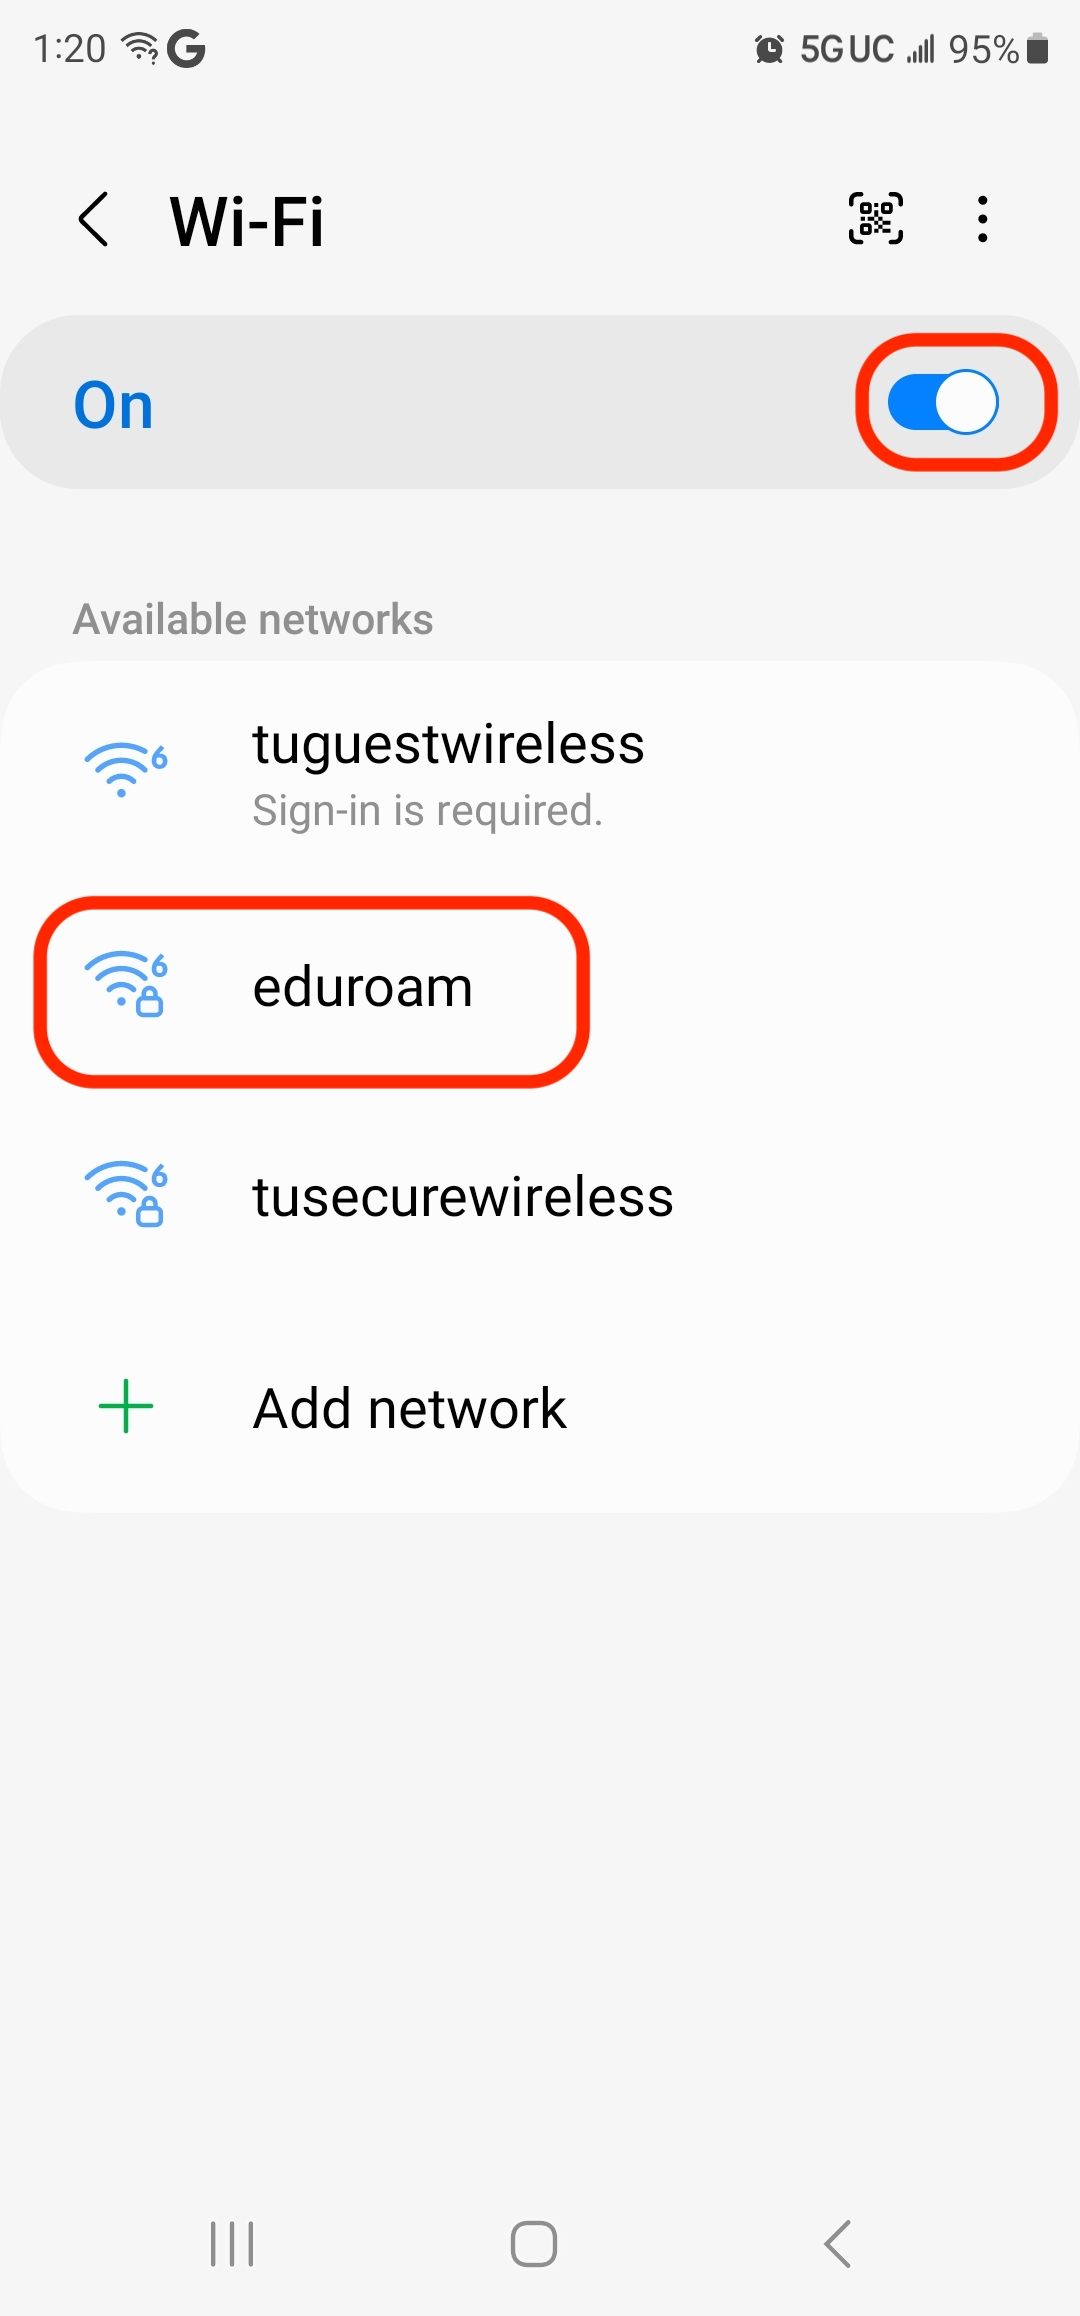
Under “Connections”, make sure "Wi-Fi" is turned on, then tap Wi-Fi.
4 of 5
From the list of available networks, select eduroam.
5 of 5
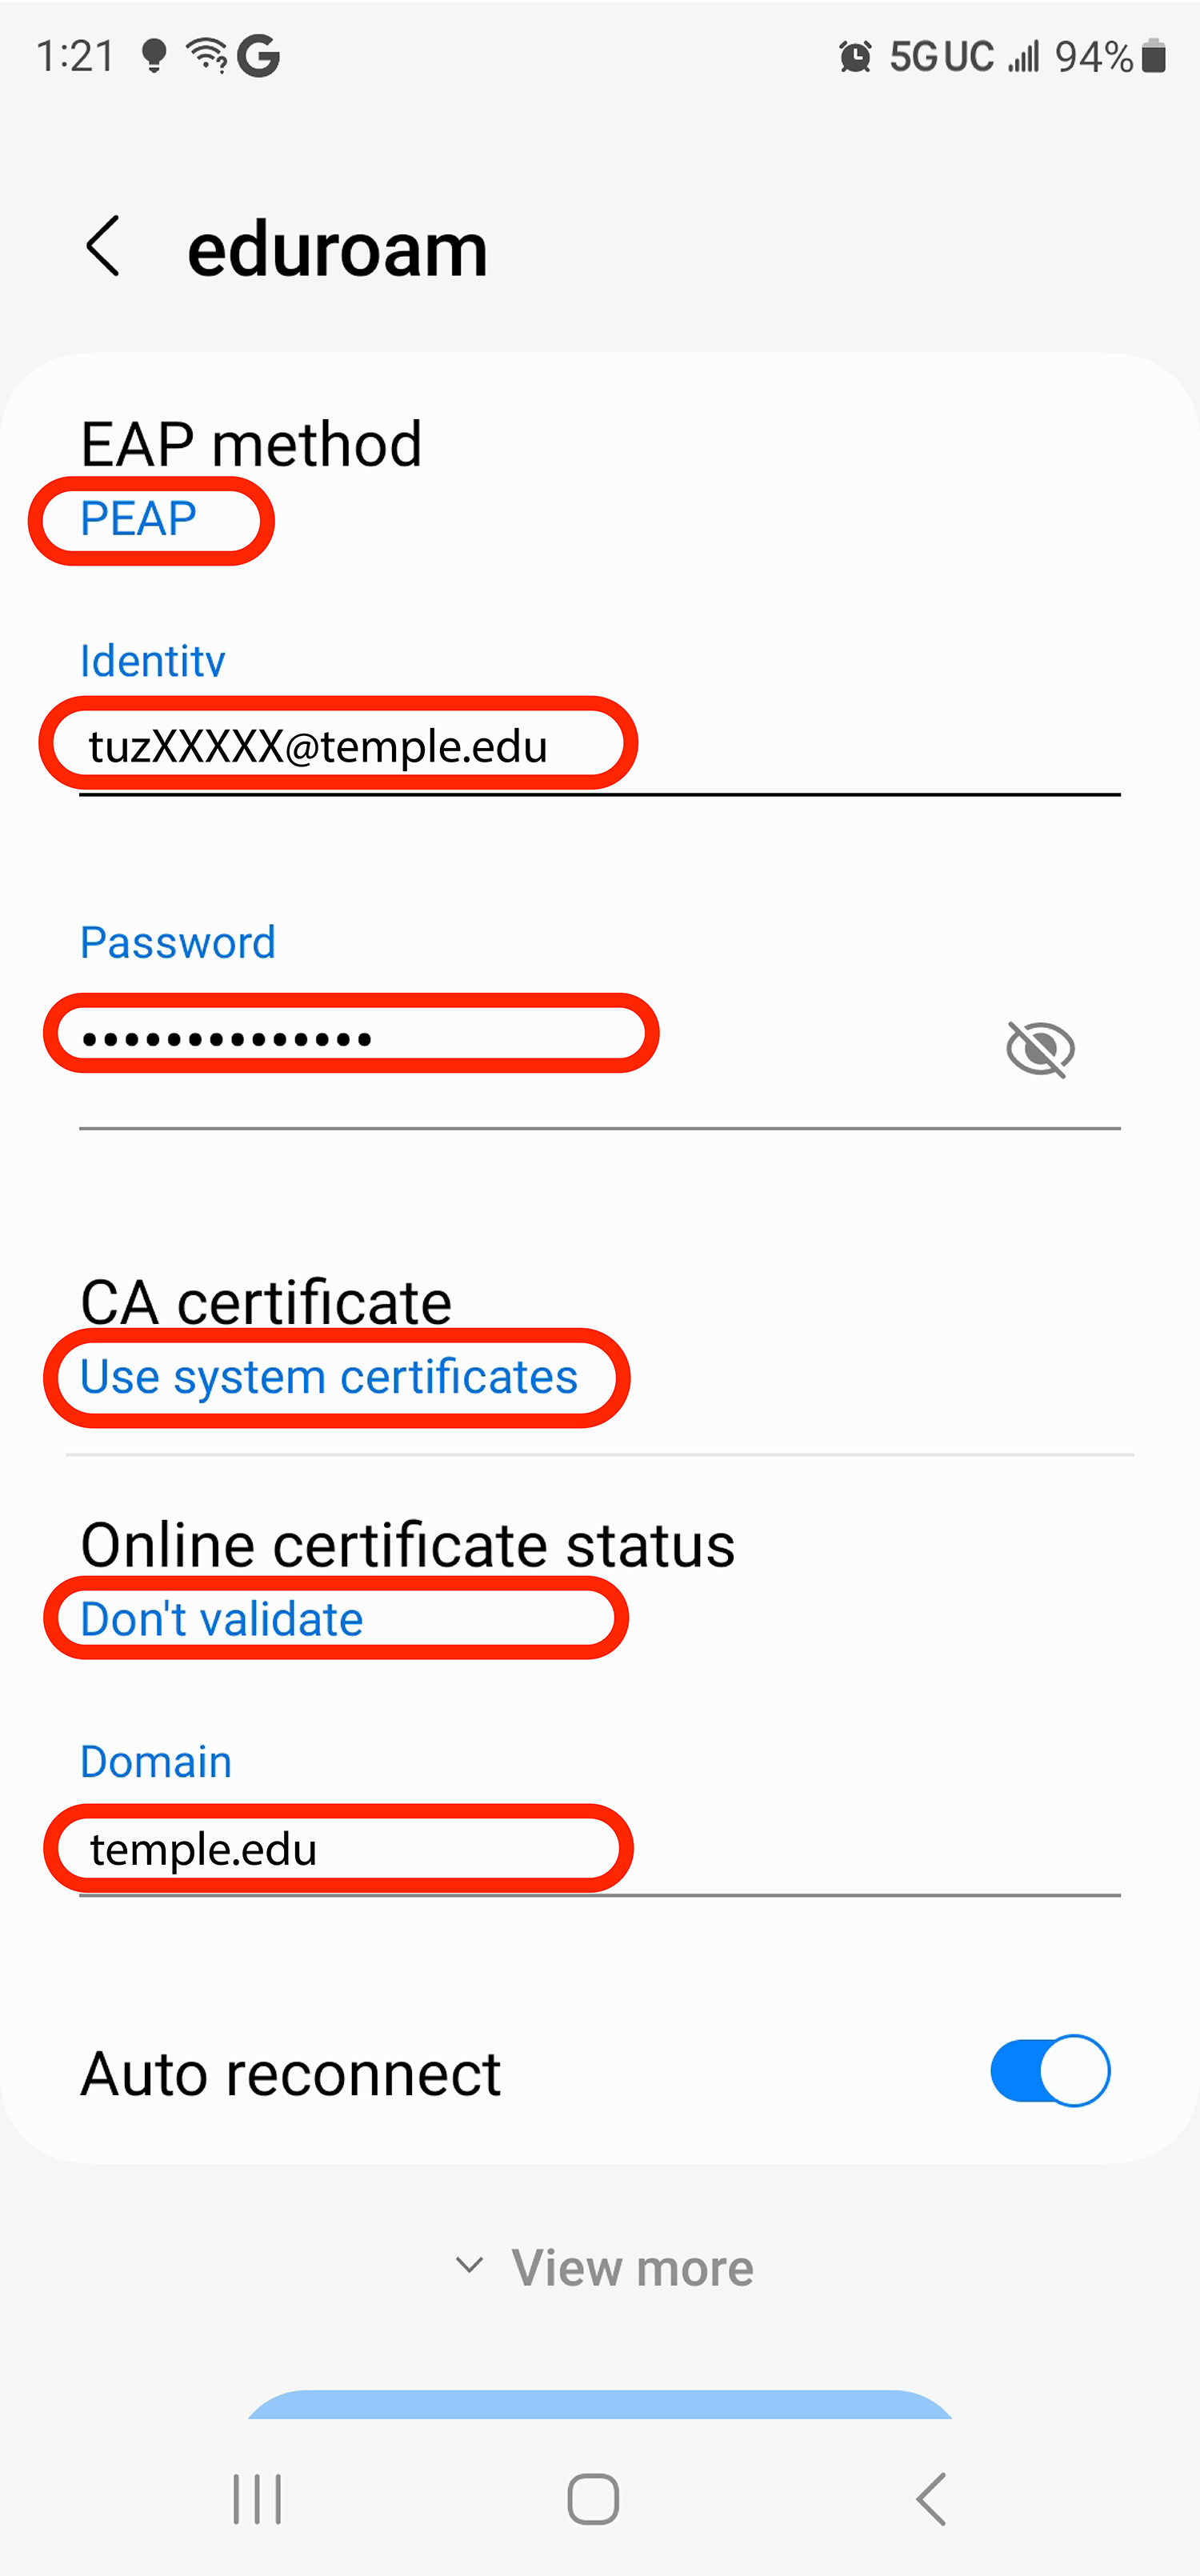
On the eduroam connect screen, fill in the following settings:
a) Verify that EAP method is set to PEAP.
b) If you see Phase 2 authentication, set it to MSCHAPV2.
c) For CA certificate, select Use system certificates.
d) for Online Certificate Status, select Don't validate.
e) If you see Domain, type: temple.edu
f) For Identity, enter your AccessNet email address (e.g. tuzXXXXX@temple.edu).
g) If you see Anonymous Identity, the field may already be populated with "anonymous". Make sure to clear out the field before moving forward.
h) In the Password box, enter your AccessNet password.
i) Then tap Connect.
Perform the following steps to connect your Android phone or tablet to Temple's wireless networks.
Note: Because of the many versions of the Android operating system, the exact steps may vary slightly depending on your device. If you are unable to connect using the steps below, refer to the Troubleshooting section below.
1 of 4
Press the Home button and tap Settings ![]()
2 of 4
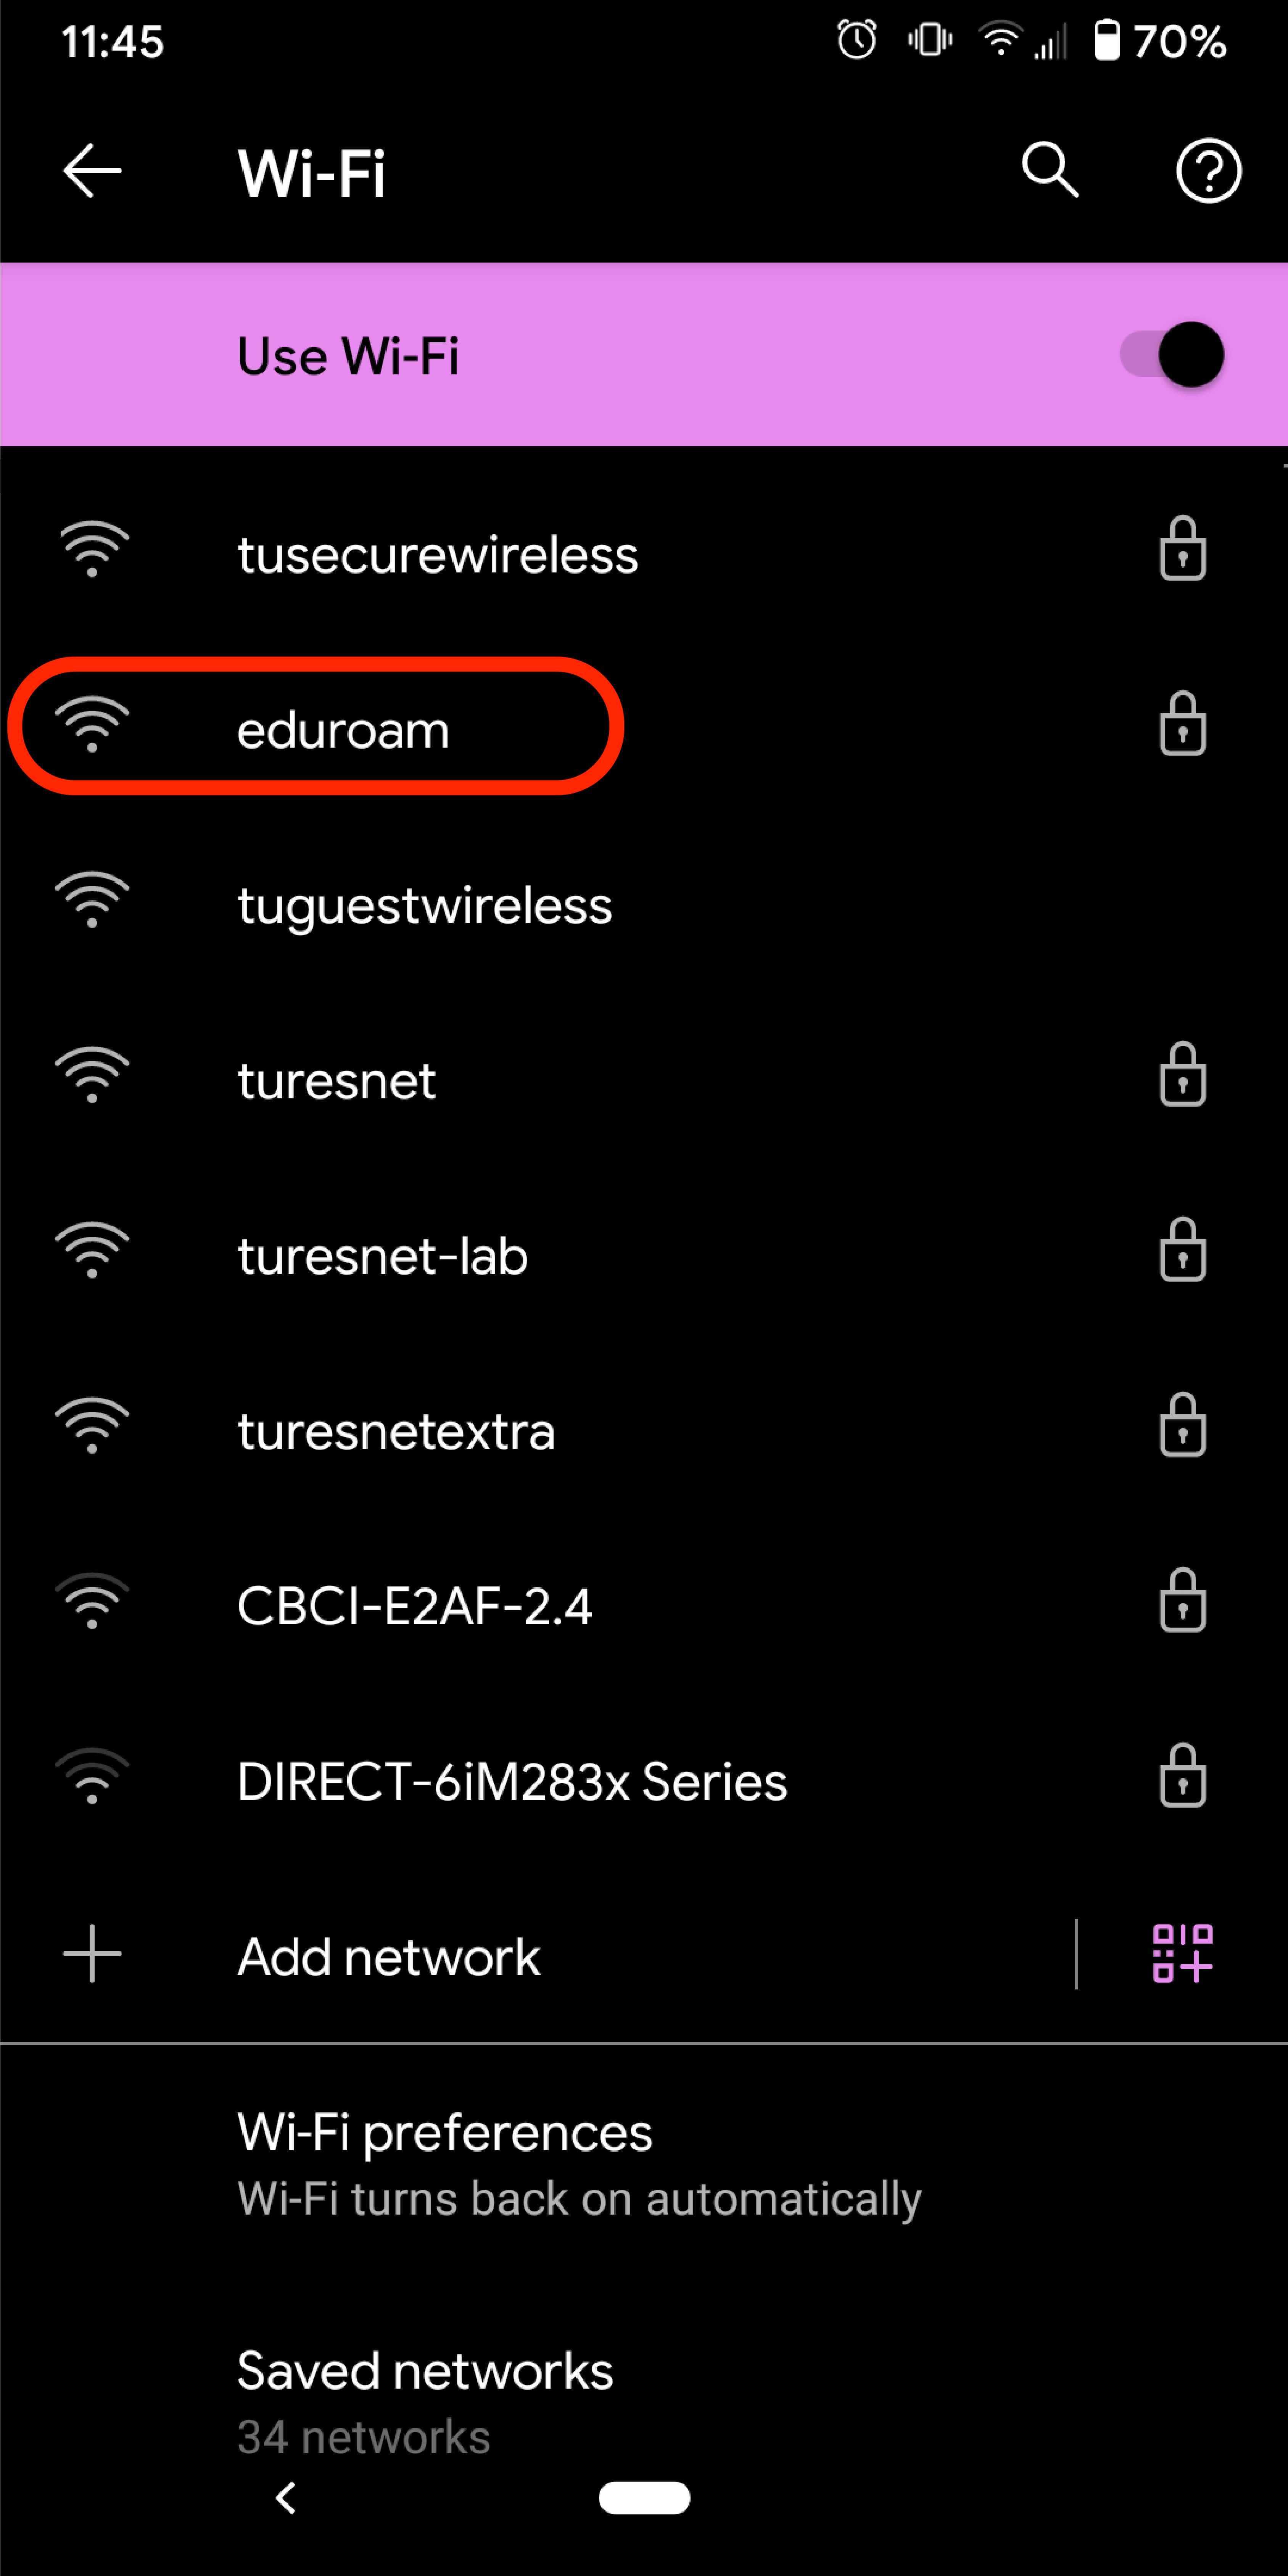
Under “Wireless and Networks”, make sure "Wi-Fi" is turned on, then tap Wi-Fi.
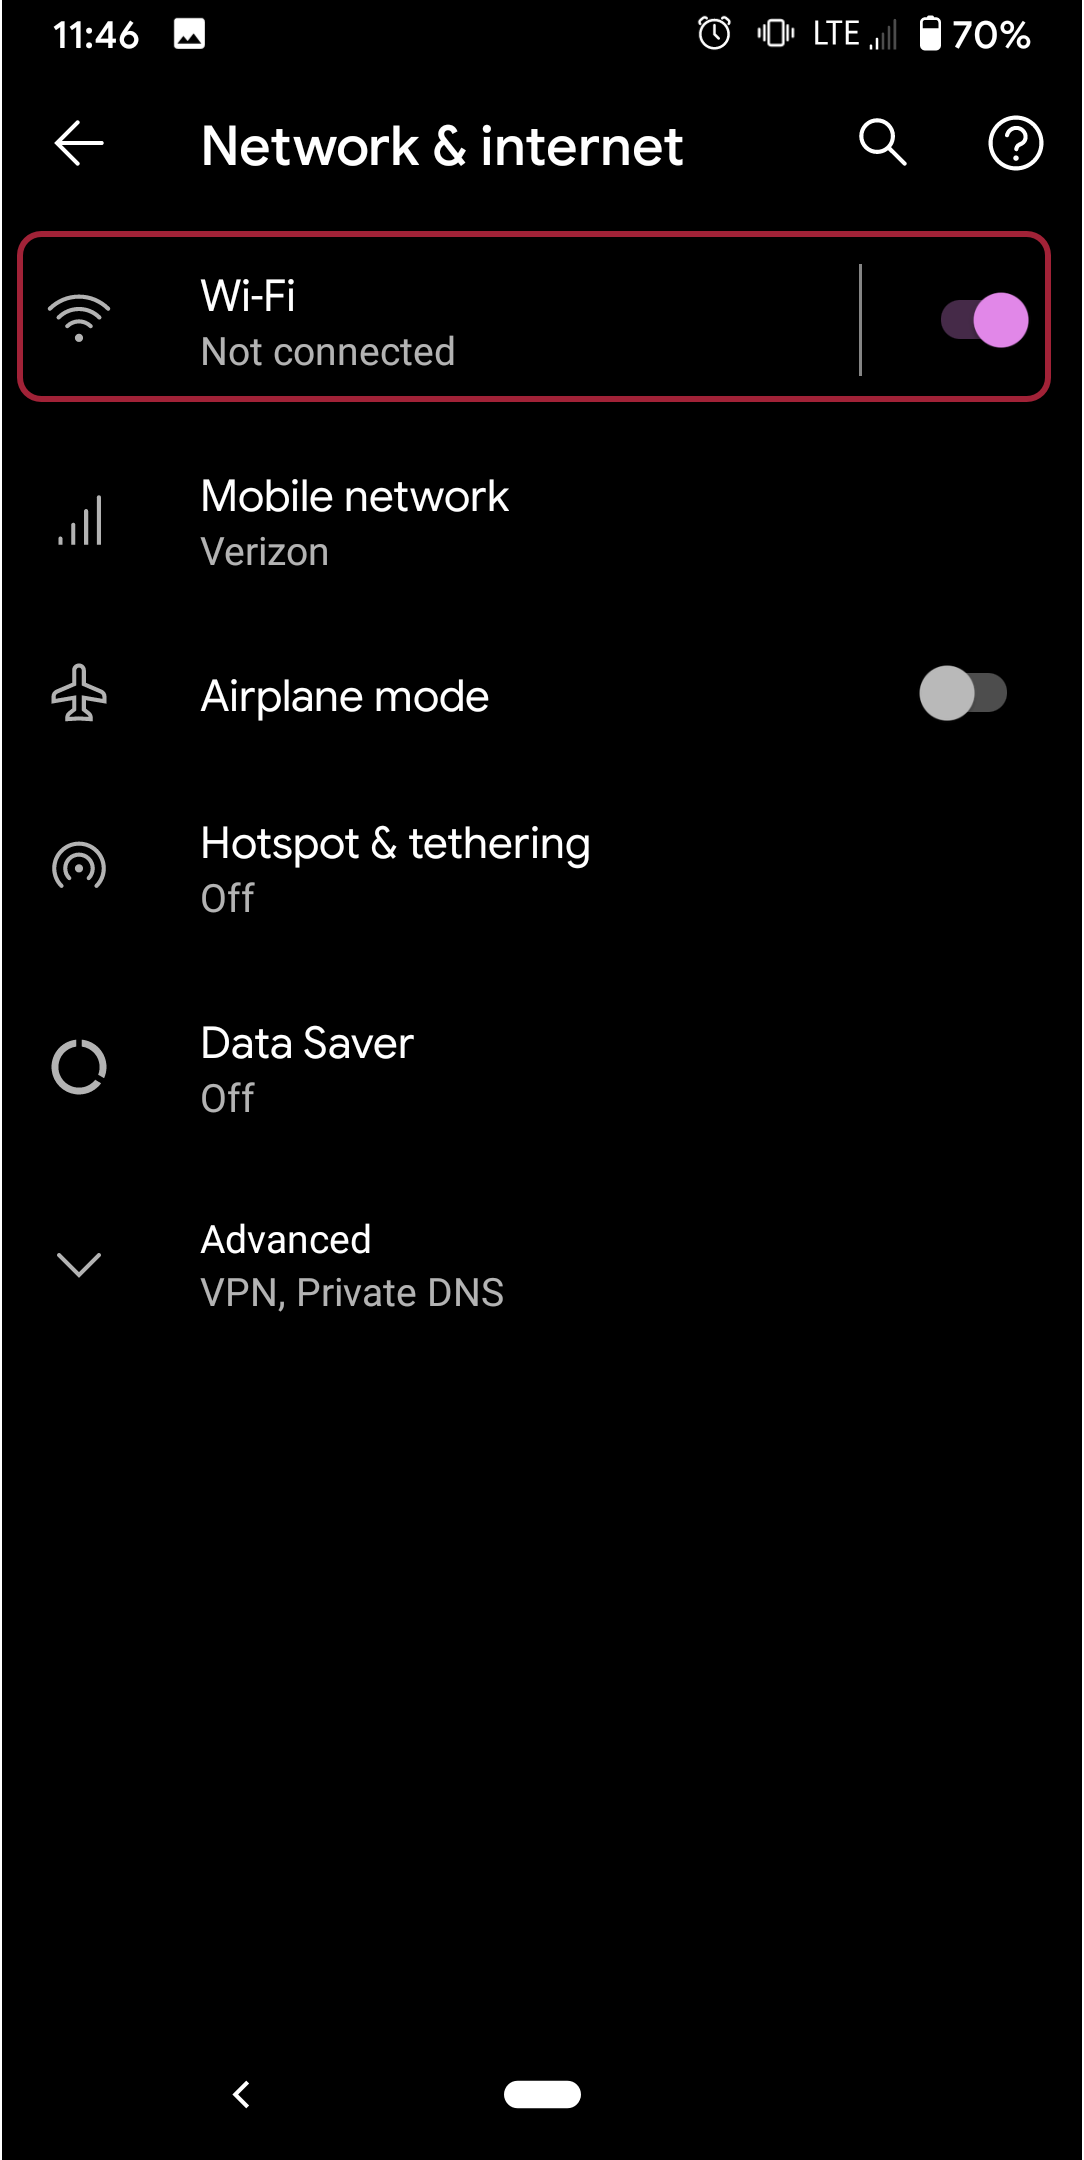
3 of 4
From the list of available networks, select eduroam.
4 of 4
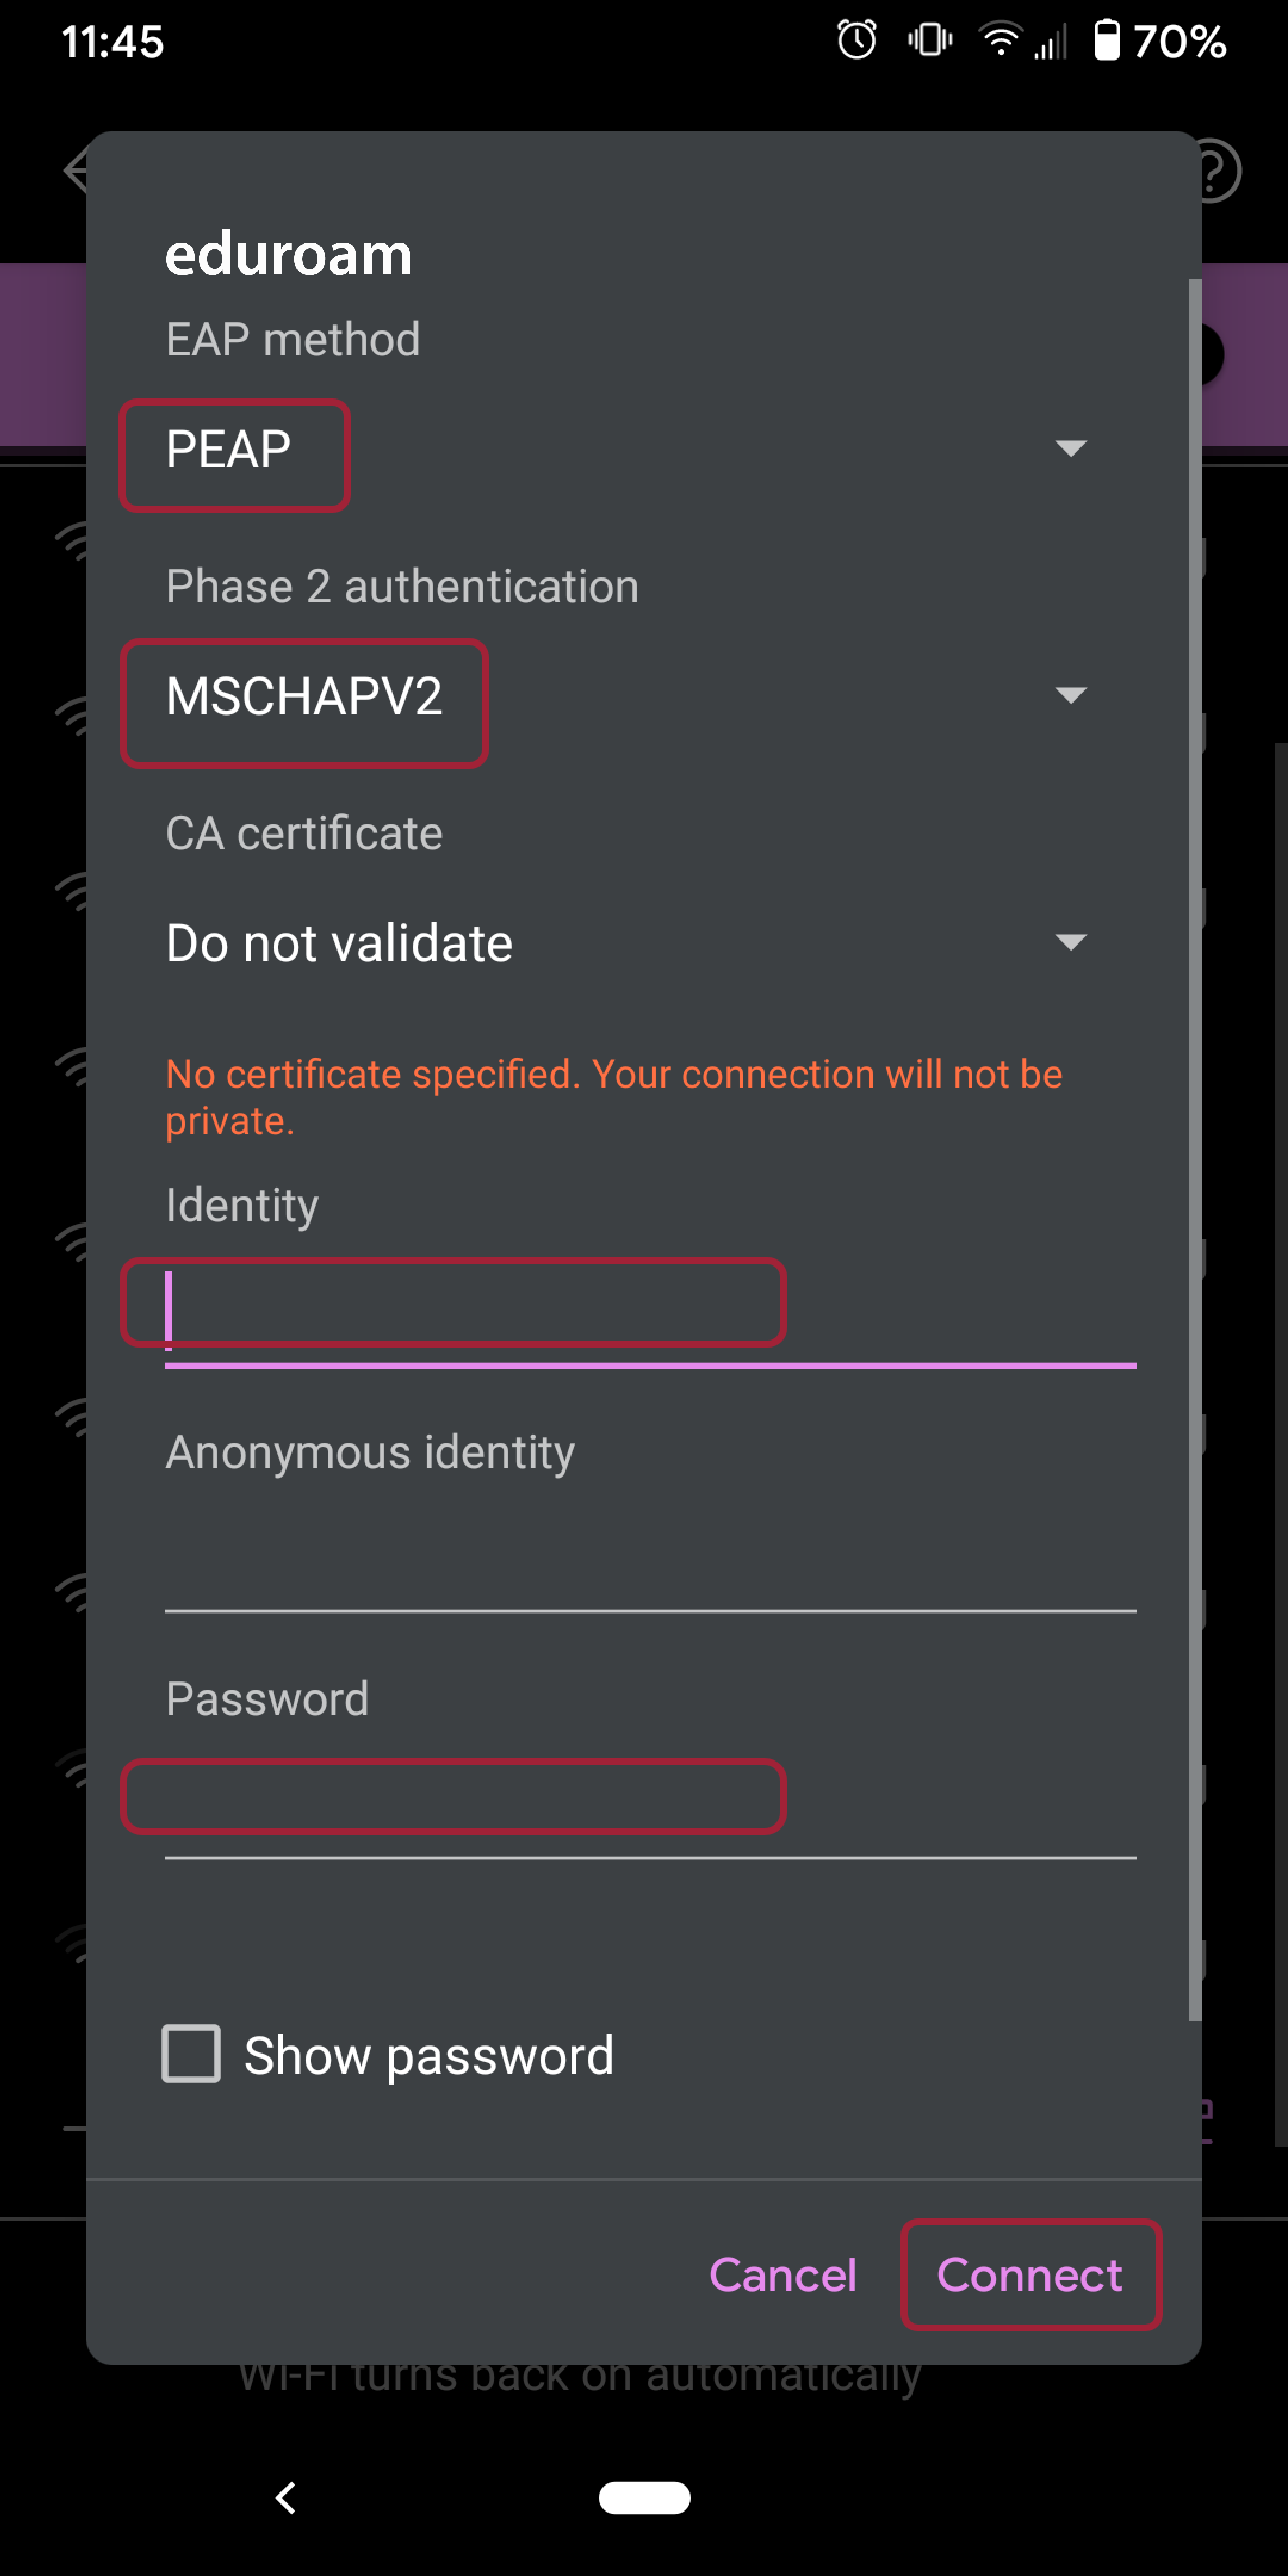
On the eduroam connect screen:
a) Verify that EAP method is set to PEAP.
b) Set Phase 2 authentication to MSCHAPV2.
c) Scroll down to Identity and enter your AccessNet email address.
d) In the Password box, enter your AccessNet password.
e) Tap Connect.
1 of 3
On the lower right-hand portion of the Chromebook desktop, click the Wi-Fi off icon and then click Not connected.
![]()
2 of 3
A list of available wireless networks will appear. Click eduroam.
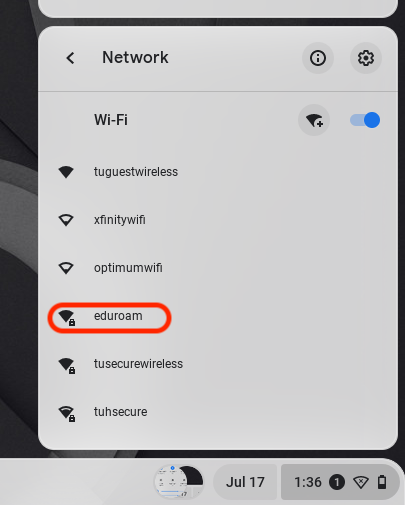
3 of 3
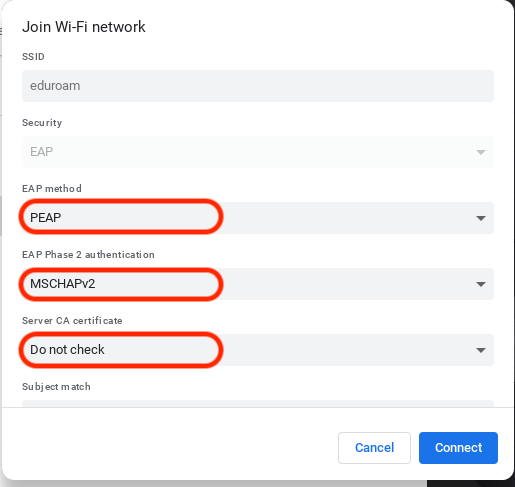
In the Join Wi-Fi network window:
a) Set EAP method to PEAP.
b) Set Phase 2 authentication to MSCHAPV2
c) Set Server CA certificate to Do not check.
d) In the Identity box, enter your AccessNet email address (e.g. tuzXXXXX@temple.edu).
e) In the Password box, Enter your AccessNet password.
f) Click Connect.

Troubleshooting
To troubleshoot your device, see the instructions below:
Windows 10 and Later - Full Setup Procedure
If you are having trouble connecting to the eduroam network, perform the steps under the "Forget Network" and "Set Up a New Connection" tabs.
1 of 4
Perform the following steps to forget the eduroam network. This will enable you to start fresh, so you can set up a new connection manually.
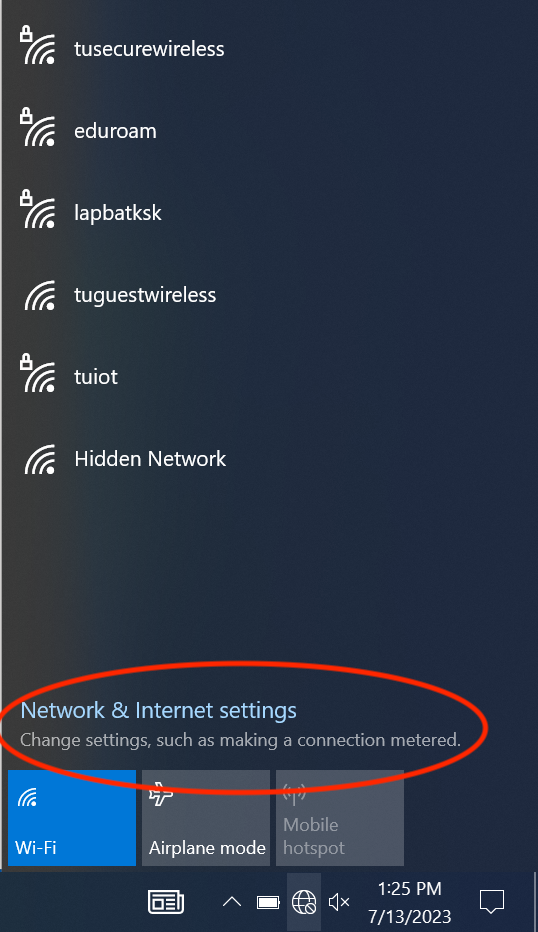
2 of 4
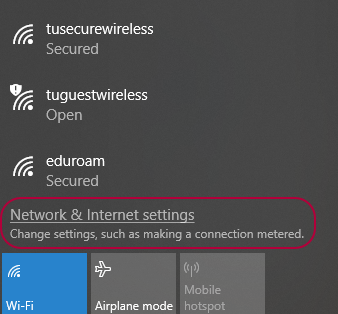
Click the wireless connection icon on the task bar and select Network & Internet settings.
3 of 4
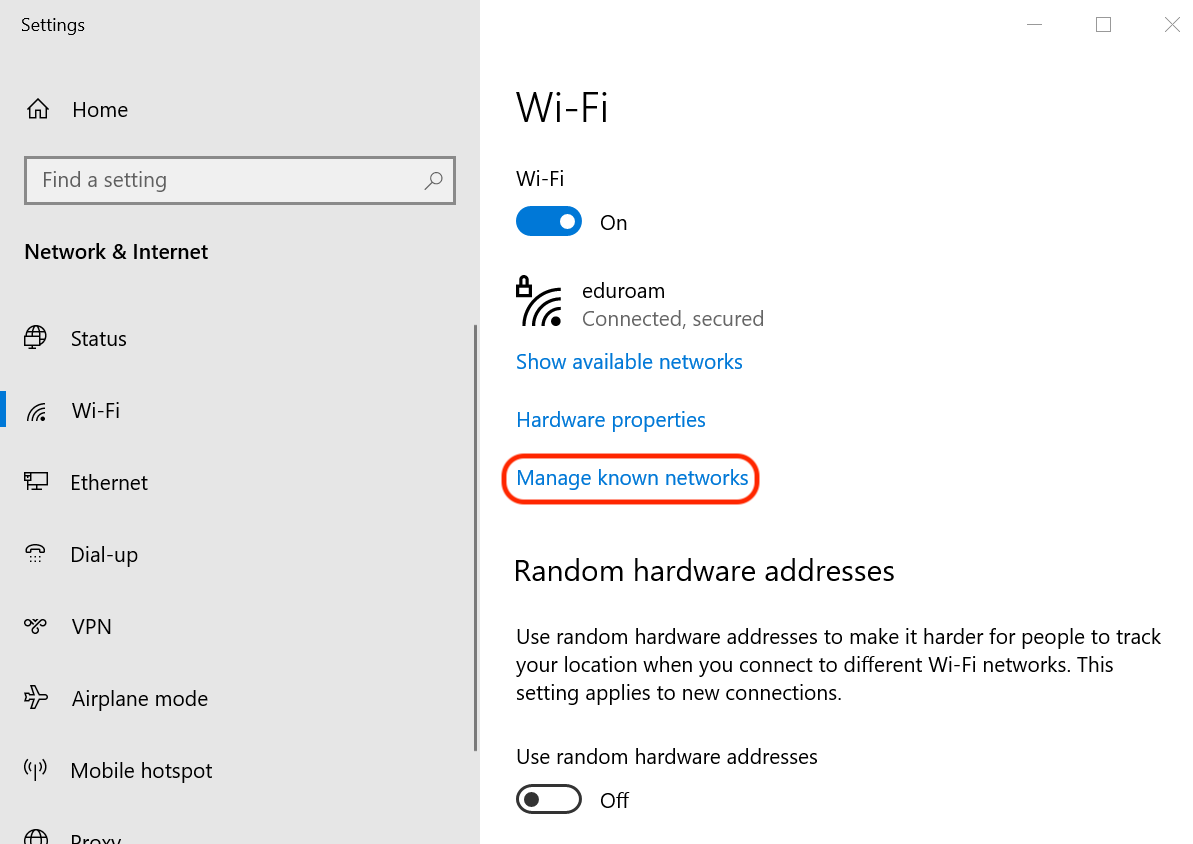
Click Manage Wi-Fi settings.
Note: You may need to scroll down to see this option.
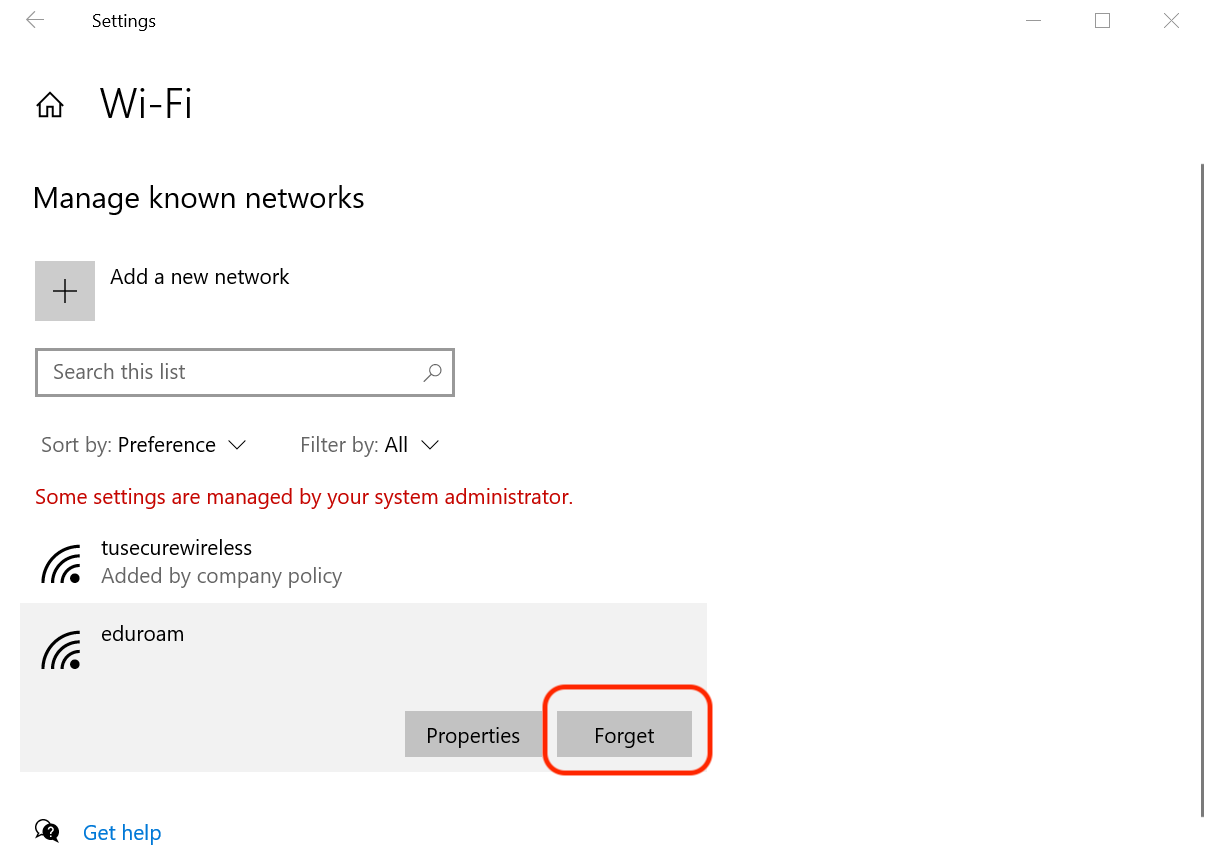
4 of 4
If the Manage known networks section appears near the bottom with the eduroam network listed, click Forget next to the eduroam network name. Then close the Manage Wi-Fi Settngs window.
1 of 13
Click on the network icon on the system tray (lower right portion of the screen next to the date and time). Then click Network & Internet settings.
Alternatively, you can right-click on the Start button and select Control Panel, then select Network and Internet.
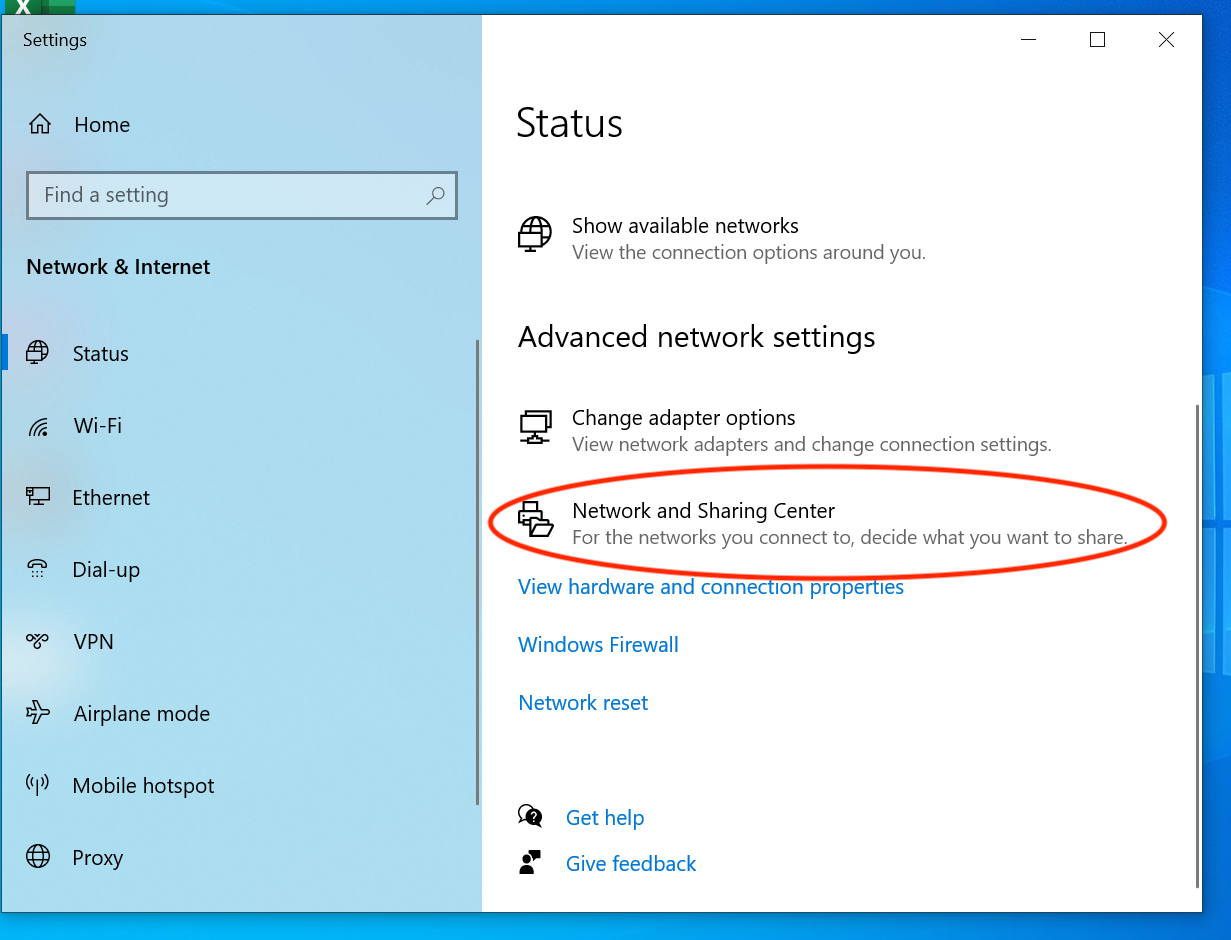
2 of 13
Click Network and Sharing Center.
3 of 13
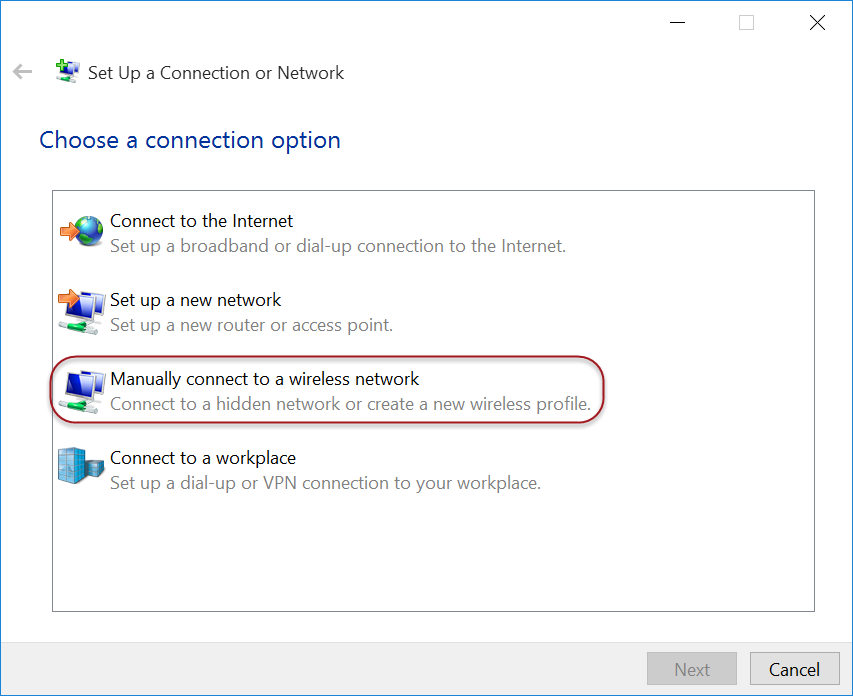
Click Set up a new connection or network.

4 of 13
Click Manually connect to a wireless network. Then click Next.
5 of 13
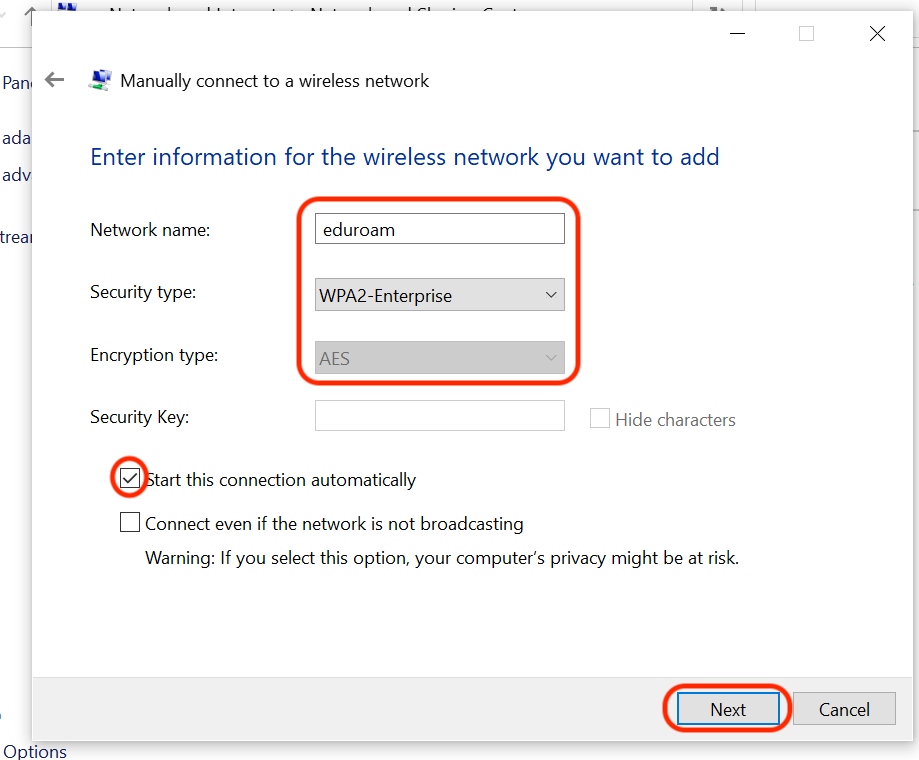
Perform the following:
a) In the Network name box, type eduroam.
b) In the Security type box, select WPA2-Enterprise.
c) In the Encryption type box, make sure AES is selected.
d) Make sure Start this connection automatically is selected.
e) Click Next.
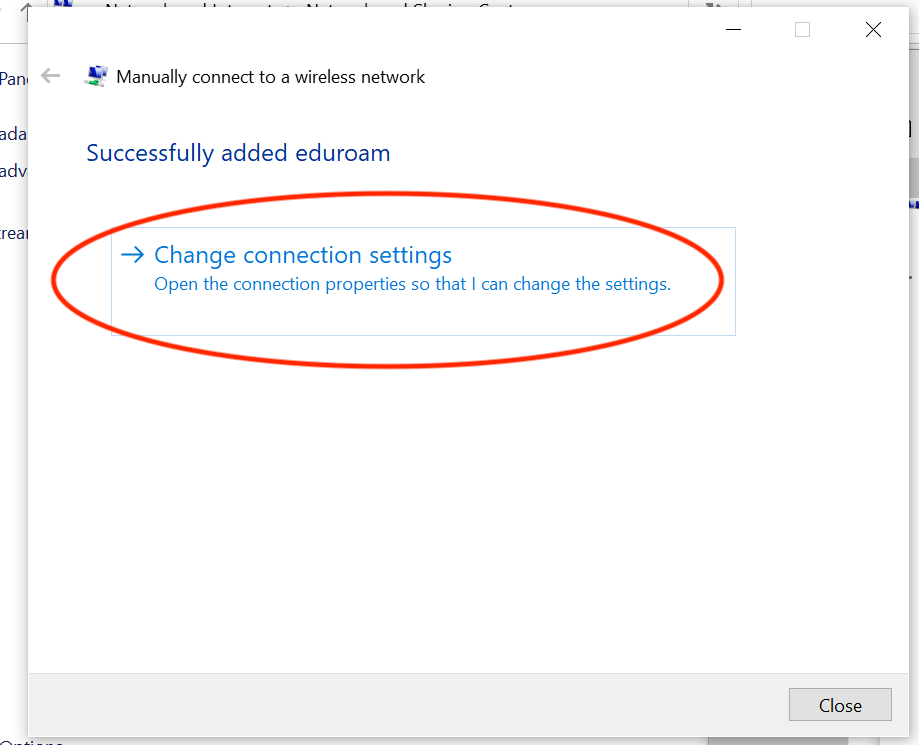
6 of 13
Click Change Connection Settings.
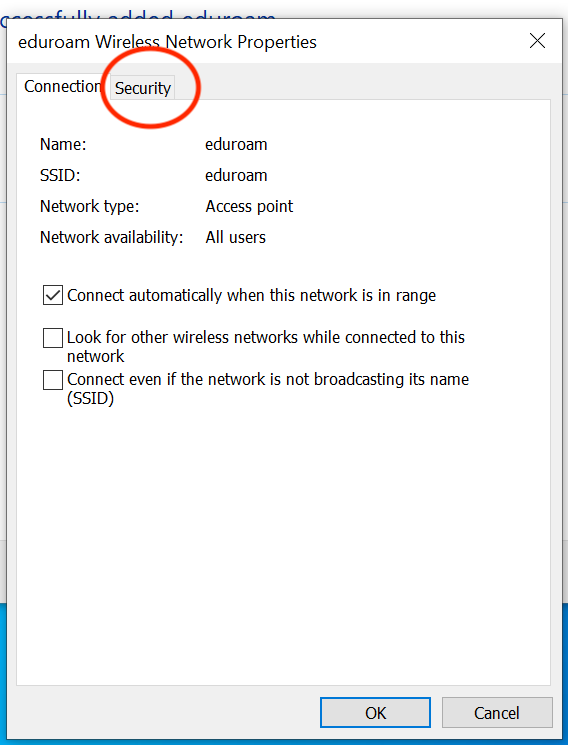
7 of 13
Click the Security tab.
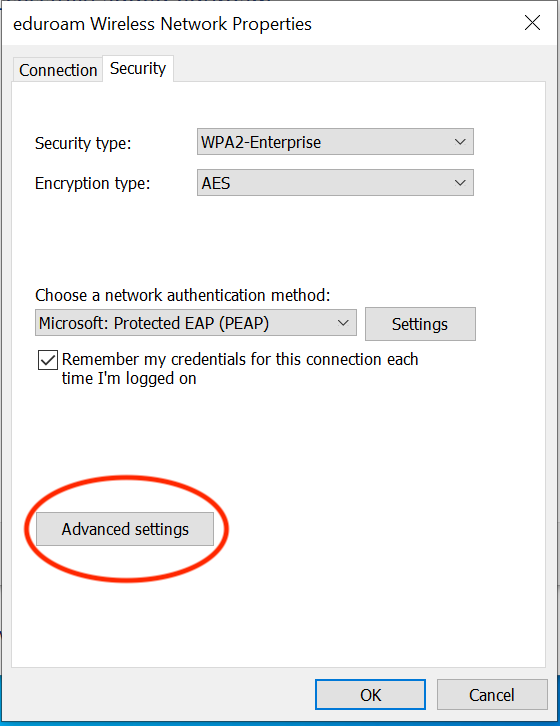
8 of 13
Click Advanced settings.
9 of 13
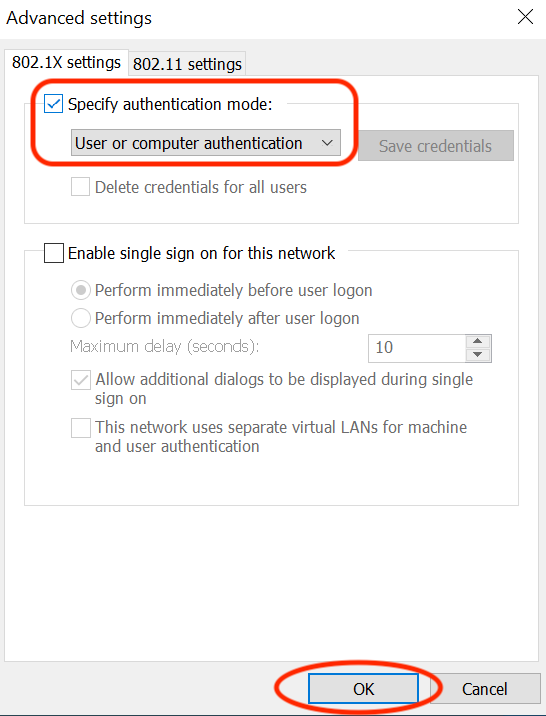
Select Specify authentication mode. Then in the box underneath, select User or computer authenticator and click OK.
10 of 13
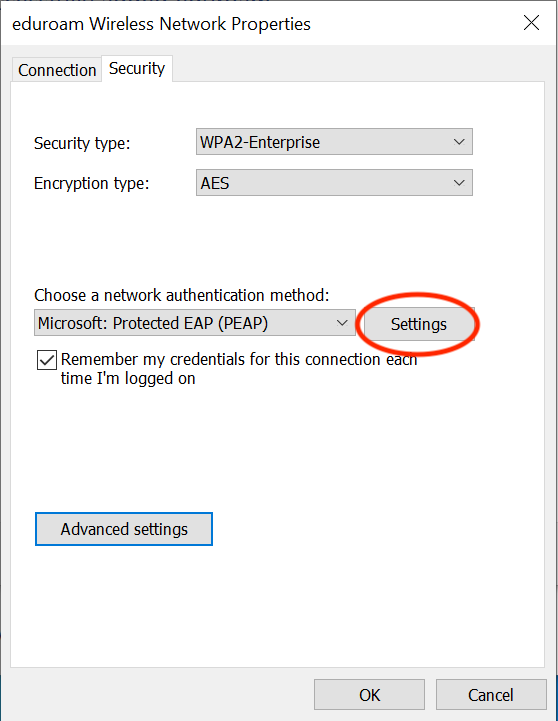
Click Settings.
11 of 13
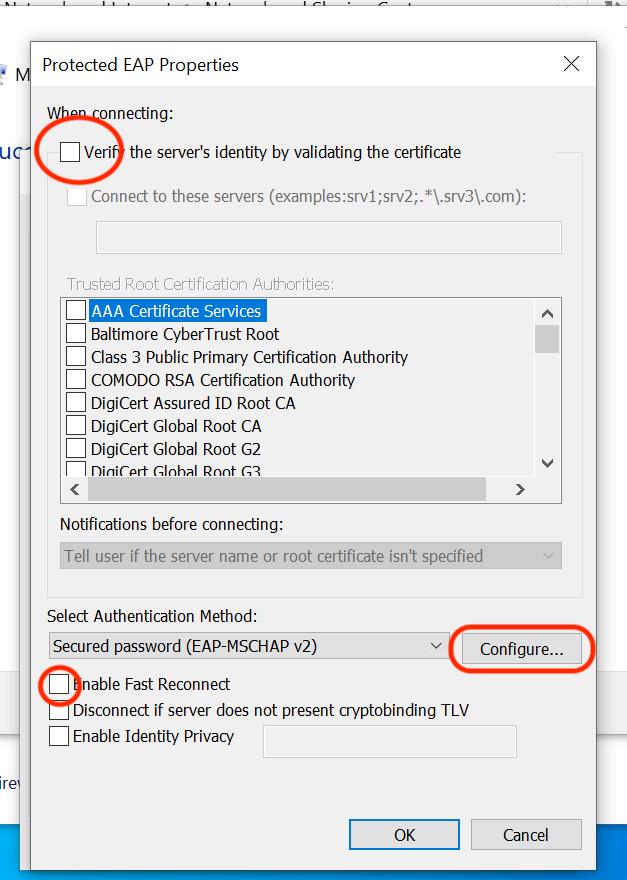
Perform the following:
a) Uncheck Verify the server's identity by validating the certificate.
b) Uncheck Enable Fast Reconnect.
c) Click Configure.
12 of 13
Uncheck Automatically use my Windows logon name and password (and domain if any). Then click OK.

13 of 13
Close all connection setup windows. Connect to the eduroam network.
1 of 9
Use the following instructions to set up your computer to access the eduroam network.
2 of 9
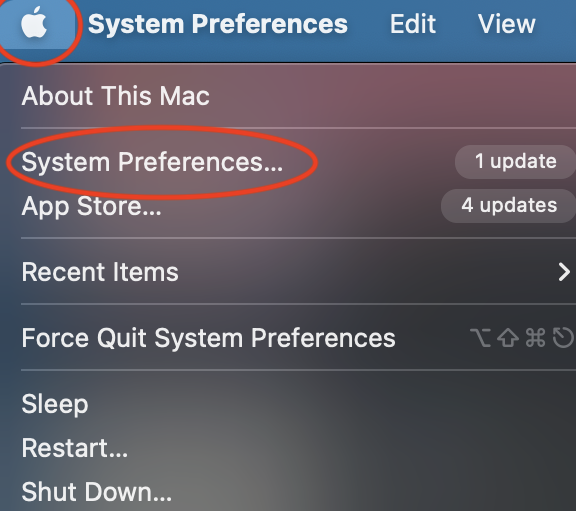
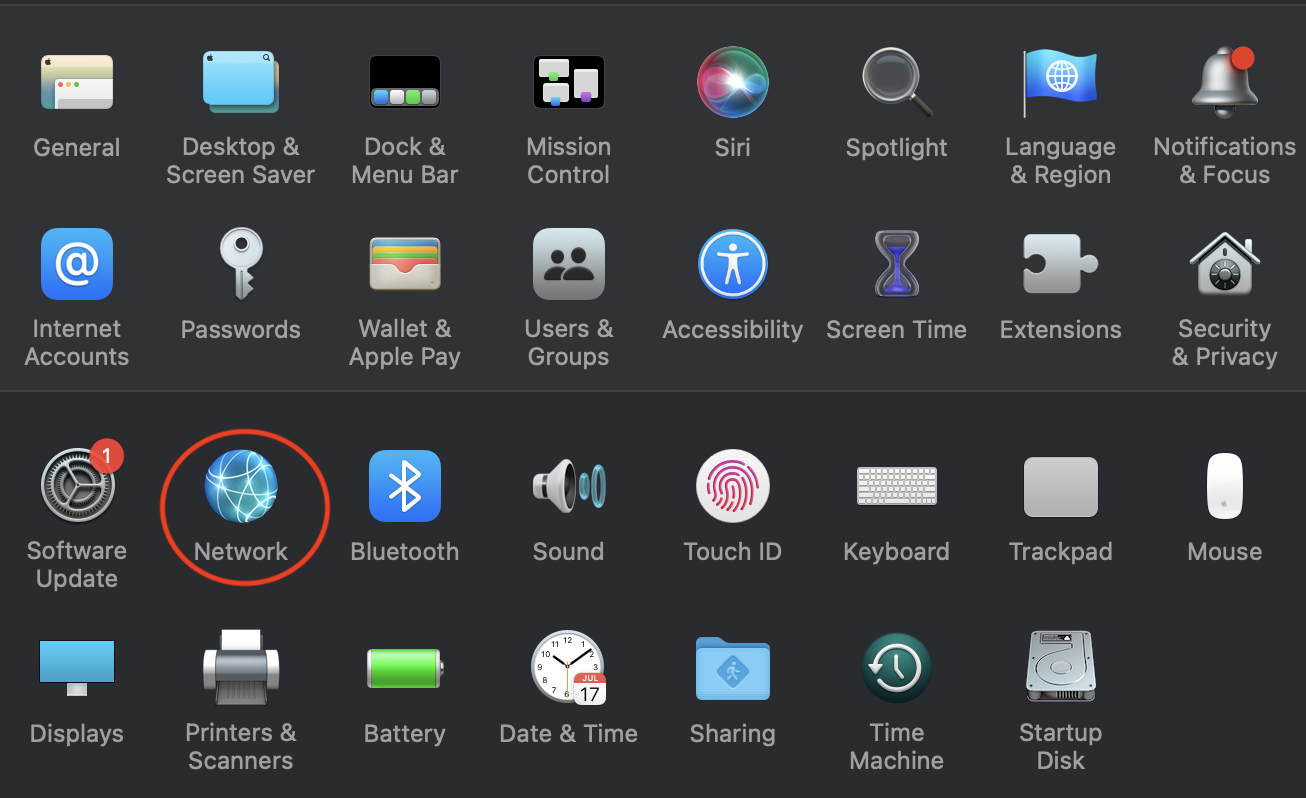
Click Apple > System Preferences.
3 of 9
Click Network.
4 of 9
Click Wi-Fi > Advanced.

5 of 9
Under Preferred Networks, click the + symbol.

6 of 9
Enter the following information:
a. Network Name: eduroam
b. Security: WPA2 Enterprise
c. Mode: Automatic
d. Your AccessNet username and password Then click OK.

7 of 9
Click OK.

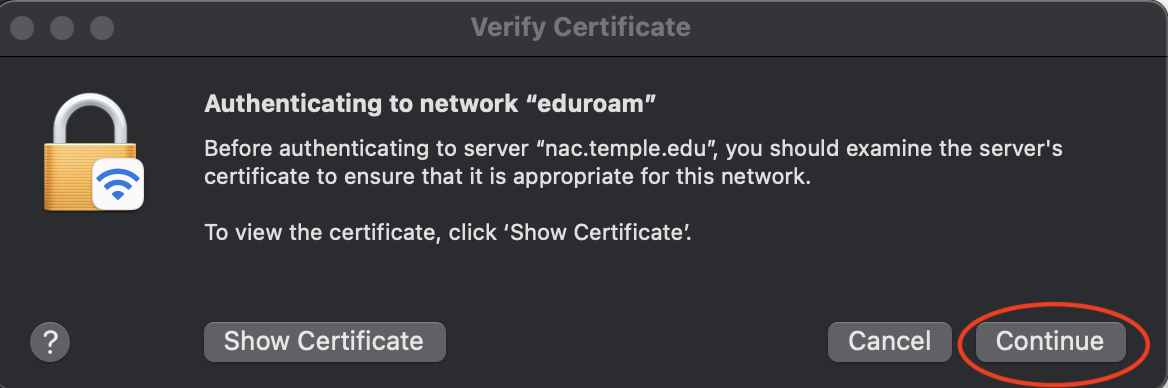
8 of 9
If prompted to continue connecting, click Continue.
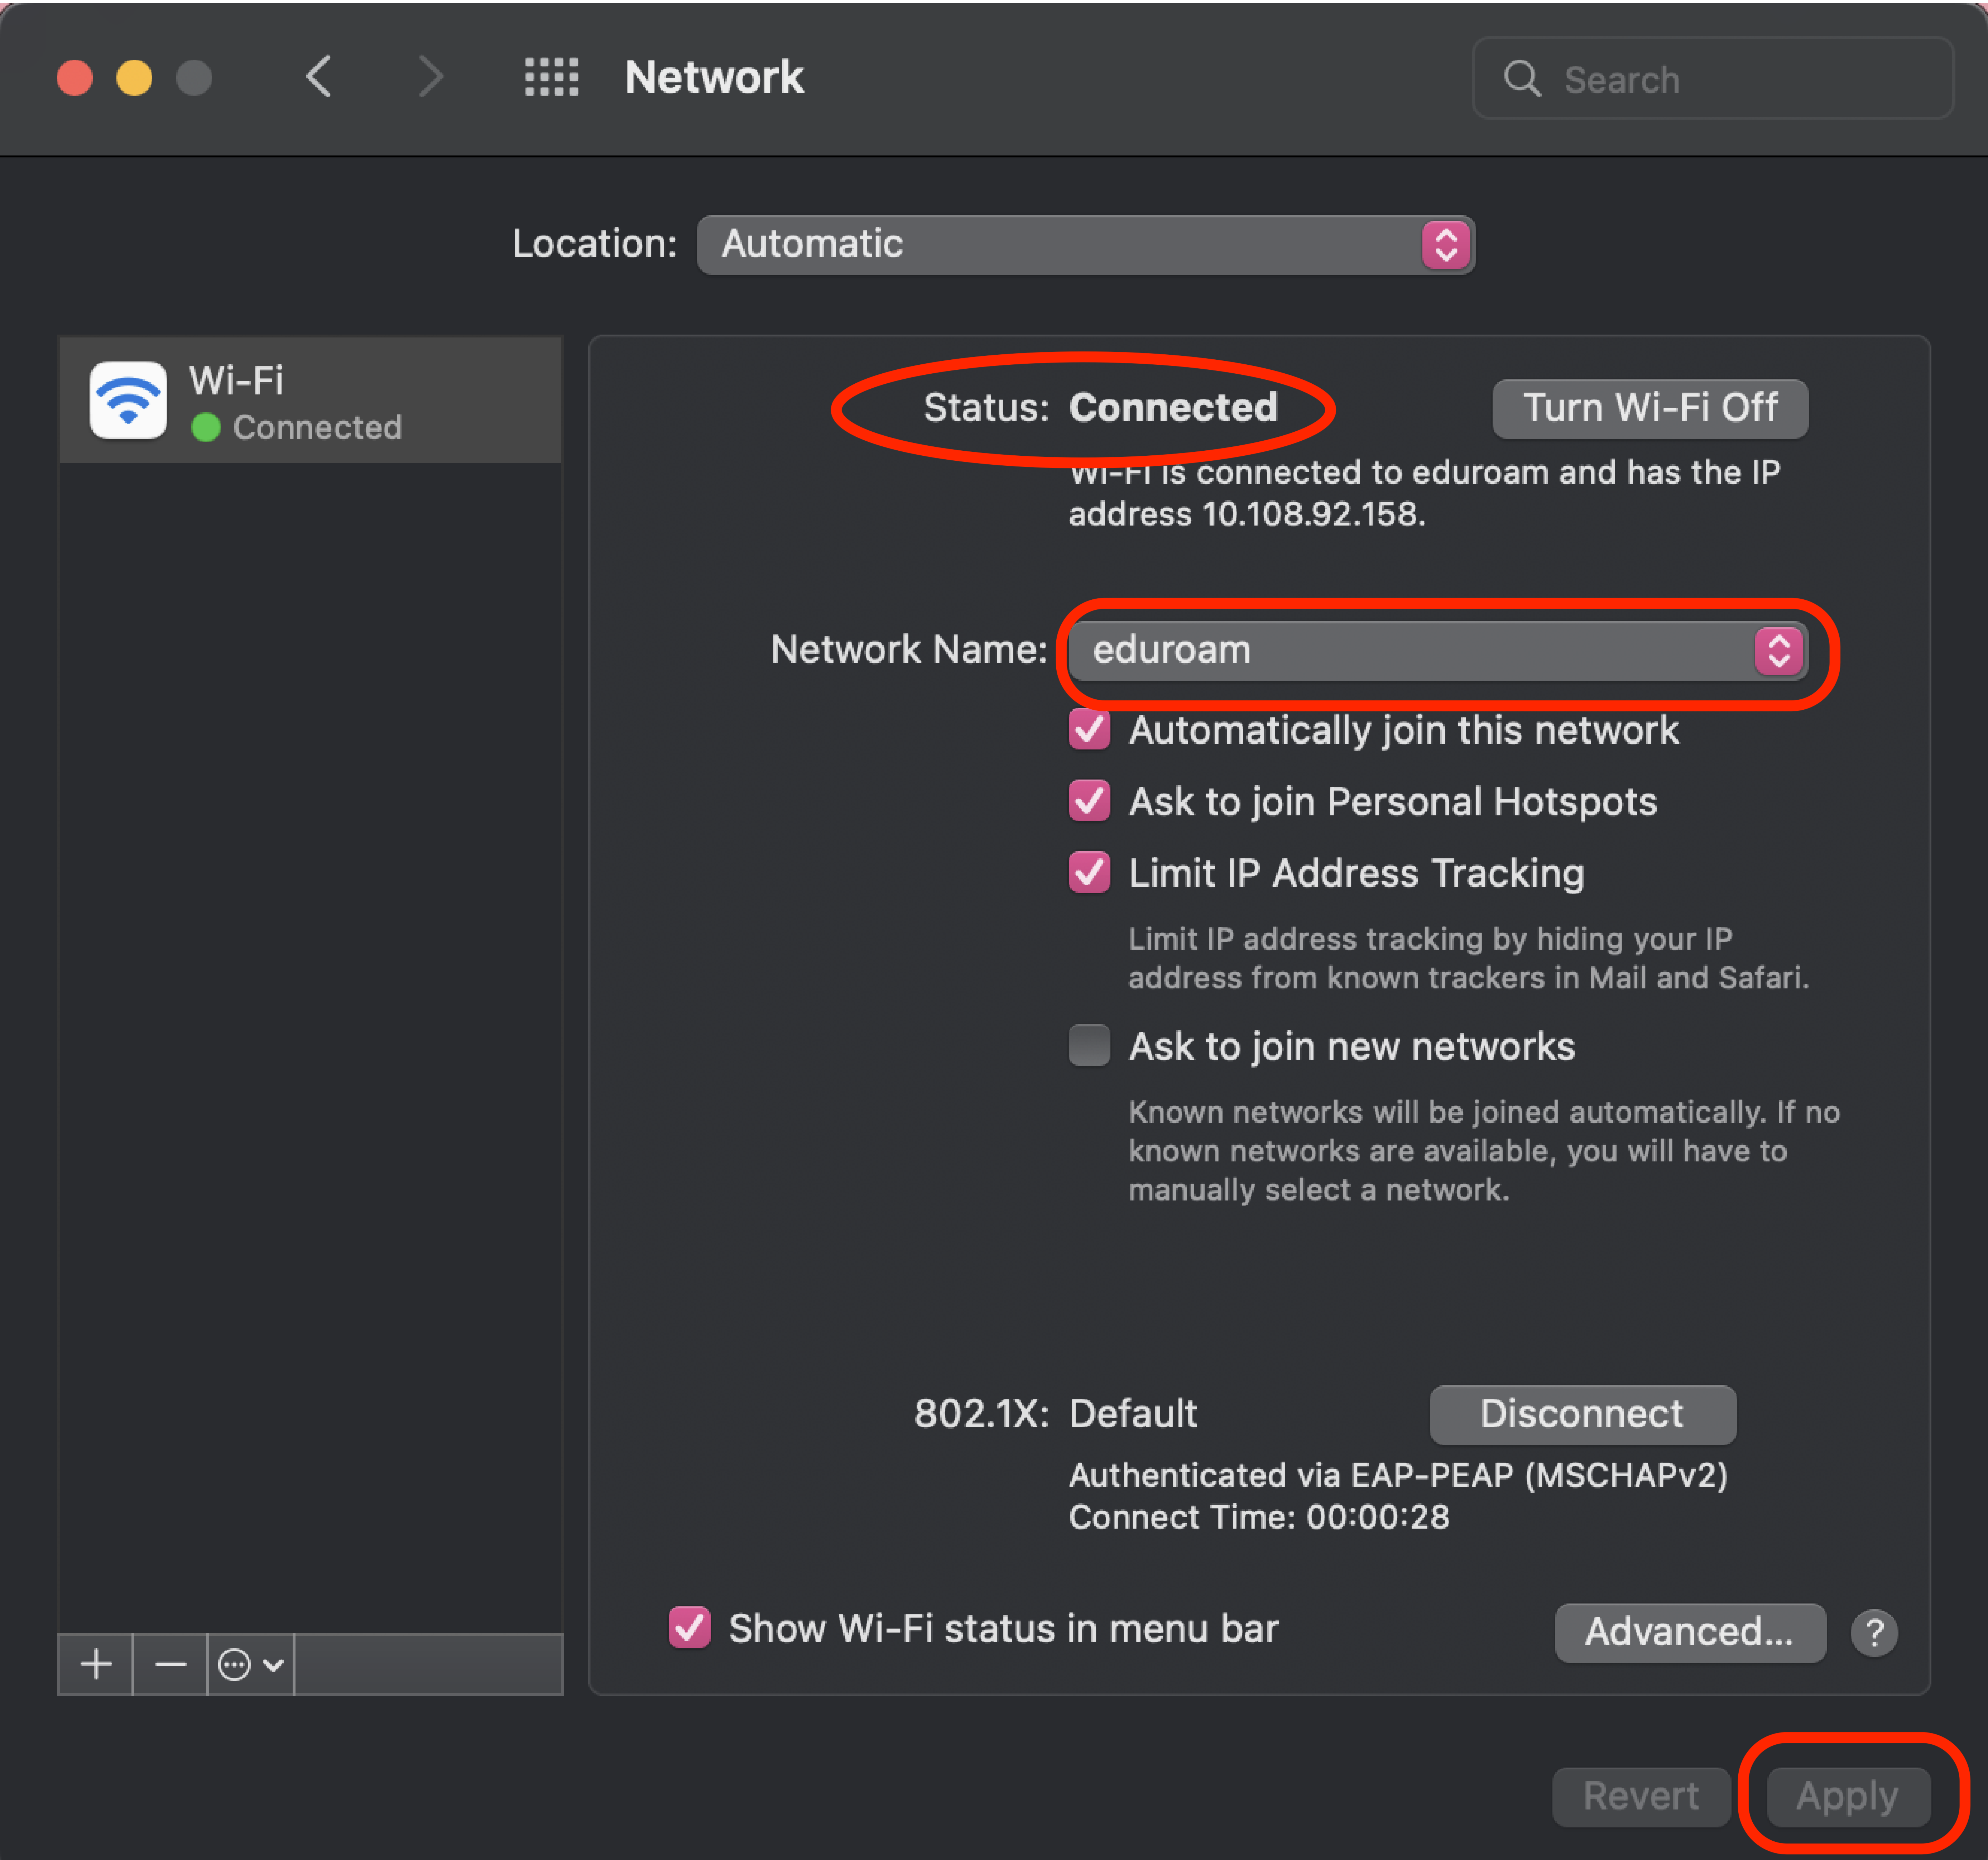
9 of 9
At the Network screen, change the Network Name to eduroam and click Apply. The connection will initiate. The status will display as "Connected".
If you are having trouble establishing a wireless connection, try to forget the network, turn Wi-Fi off/on, and reconnect as described below:
- From the main screen, tap Settings.
- Tap Wi-Fi.
- Tap the information symbol

- Tap Forget this Network.
- Tap Forget.
- Tap Wi-Fi on the upper-left portion of the screen.
- Tap the On button next to Wi-Fi to turn off Wi-Fi.
- Tap the Off button next to Wif-Fi to turn on Wi-Fi.
- Tap the eduroam network.
- Enter your AccessNet email address (e.g. tuzXXXXX@temple.edu) and password.
- Click Join.
Note, if these instructions don’t work and your phone was issued by a business/organization where you work, your phone may be blocked from connecting. In this case, please contact the business/organization technical support staff for advice. Otherwise, please contact Temple’s Information Technology Services Technology Support Center for connecting assistance
Note: Because of the many versions of the Android operating system, the exact steps may vary slightly depending on your device.
If you are having trouble establishing a wireless connection, try to forget the network, turn Wi-Fi off/on, and reconnect as described below:
- From the Apps screen, tap Settings.
- Tap Networks.
- Tap the Wi-Fi icon.
- Tap eduroam.
- Tap Forget.
- Tap the On button next to W-Fi to turn off Wi-Fi.
- Tap the Off button next to Wif-Fi to turn on Wi-Fi.
Then perform the instructions described above under "Connect a Computer, Phone or Tablet."
Note, if these instructions don’t work and your phone was issued by a business/organization where you work, your phone may be blocked from connecting. In this case, please contact the business/organization technical support staff for advice. Otherwise, please contact Temple’s Information Technology Services Technology Support Center for connecting assistance.
If you are having trouble establishing a wireless connection, try to forget the network, turn Wi-Fi off/on, and reconnect as described below:
- Sign in to your Chromebook.
- At the bottom right, select the time.
- Select Settings.
- In the "Network" section, select Wi-Fi.
- Select Known networks.
- Find the network you want to forget, then select More.
- Click Forget.
Then perform the instructions described above under "Connect a Computer, Phone or Tablet."
Guest Access
Planning to visit campus soon? If you are visiting from a participating Eduroam institution, log in to the eduroam wireless network. Otherwise, follow the instructions below to register for free Wi-Fi access on the TUguestwireless network. Once you are registered and receive your password, you will be able to log in to the TUsecurewireless network for up to five days. If you need additional time, you can simply re-register.
-
You will need to have your cell phone with you during the registration process, as a pre-assigned password will be sent to you as a text message.
-
The text message will be sent to you by Twilio, Inc. For a list of countries that are covered, go to the coverage page, scroll down and click the Supported destinations link.
-
Once you are registered, you can use the same username and password to connect from any device.
1 of 4
Connect to the TUguestwireless network by selecting it from the list of available Wi-Fi networks. Next, if your web browser doesn't automatically open, make sure to open it.
2 of 4
In the Guest Registration window, perform the following:
a) Type your name.
b) Type your cell phone number.
c) Click the box next to I accept the terms of use. Then click Register.
3 of 4
A confirmation window appears with instructions. You will also shortly receive a text message with your assigned password. Copy this password because you will need it to connect to the TUsecurewireless network.
4 of 4
Once you receive your password via a text message, connect to the TUsecurewireless network and log in as follows:
- username = your cell phone number (The format should be the same as used in step 2. Include any parentheses, periods, dashes or spaces you previously entered.)
- password = the text sent to your cell phone.
Connect a Game Console or Media Player in a Residence Hall
To connect a media device in a Temple University residence hall:
- Register the Device
Go to the TUconnect website and log in with your AccessNet username and password. Then follow the instructions to register the game console or media device. As part of this process, you will need to register the MAC address of the device. Instructions for obtaining the MAC address appear below.
- Connect the Device
To connect the video game or media player, you will need to follow the instructions specific to your specific device. Use the turesnetextra wireless network and when prompted for a password or key, type templeowls.
For more information, see our overview video.
Obtain a Media Player MAC Address
To determine the MAC address of your device, follow the steps below:
- From the main menu, select Settings.
- Under Settings, select About. The combination of 12 letters and numbers next to Wireless ID or Ethernet ID is the MAC address.
On the back of your player, there are two sets of 12 letters and numbers. One set is for Ethernet (wired) and one set is for wireless.
As an alternative, you can obtain the MAC address as follows:
- From the Roku home screen, select Settings.
- From the Settings screen, select Player Info.
- From the home screen, select Settings (the gear icon) in the upper right-hand corner.
- Select System.
- Select Console Information. The combination of twelve letters and numbers next to MAC Address (Wi-Fi) is the MAC Address.
- Select Settings on the main menu.
- Select Network.
- Select View Connection Status. The combination of twelve letters and numbers next to MAC Address (Wi-Fi) is the MAC Address.
- Select Settings from the Home menu.
- Select Network.
- Select Advanced Settings.
- Under the IP Settings tab, the combination of twelve letters and numbers next to Wireless MAC is the MAC Address.
- Press the Menu button on your controller, and then select Settings.
- Select Network.
- Select Network settings.
- Select Advanced settings. The combination of twelve letters and numbers next to Wireless MAC is the MAC Addres
- From the system menu, select System Settings.
- Select Internet.
- The combination of twelve letters and numbers next to System MAC Address is the MAC Address.